Showing posts with label Fruits/Vegetables. Show all posts

Monday, December 30, 2024

Berry Pavlova


I hesitate to post this because I didn't do much to make it my own, but I love it so much that I want to keep track of it here. 

This is the first time I've ever even eaten pavlova, and man, was I pleasantly surprised. It's light, sweet, fresh, crisp, chewy, and actually quite simple to make. Honestly one of the best summer desserts ever.

If you're looking for a delicious pavlova recipe, look no further. Actually, you should go check out Sally's Baking Addiction because she included a video of this recipe on her site. Great work. She's one of my favs.

Berry Pavlova
Adapted from Sally's Baking Addiction

Pavlova Ingredients: 

  • 4 large egg whites (room temperature)
  • 1 cup white sugar
  • 1 teaspoon vanilla extract or vanilla paste
  • 1/2 teaspoon cream of tartar
  • 1 teaspoon cornstarch
Topping Ingredients:
  • 1 cup heavy whipping cream
  • 2 tablespoons sugar
  • 3-4 cups fresh berries

Instructions:

Preheat oven to 350 degrees Fahrenheit and line a baking sheet with parchment paper.

In a small bowl, mix the cream of tartar and cornstarch and set aside for later.

In the bowl of a stand mixer fitted with a whisk attachment, beat the egg whites on medium high until soft peaks form.

While the mixer is still on, slowly add half the sugar and beat for 30 seconds. Then slowly add the remaining sugar. Once aded, turn mixer to high speed and beat until glossy stiff peaks form. This will take about 2 minutes.

Add vanilla and beat for another minute. Continue to beat on high until peaks are very stiff. 

Fold in the cream of tartar/cornstarch mixture using a silicone/rubber spatula.

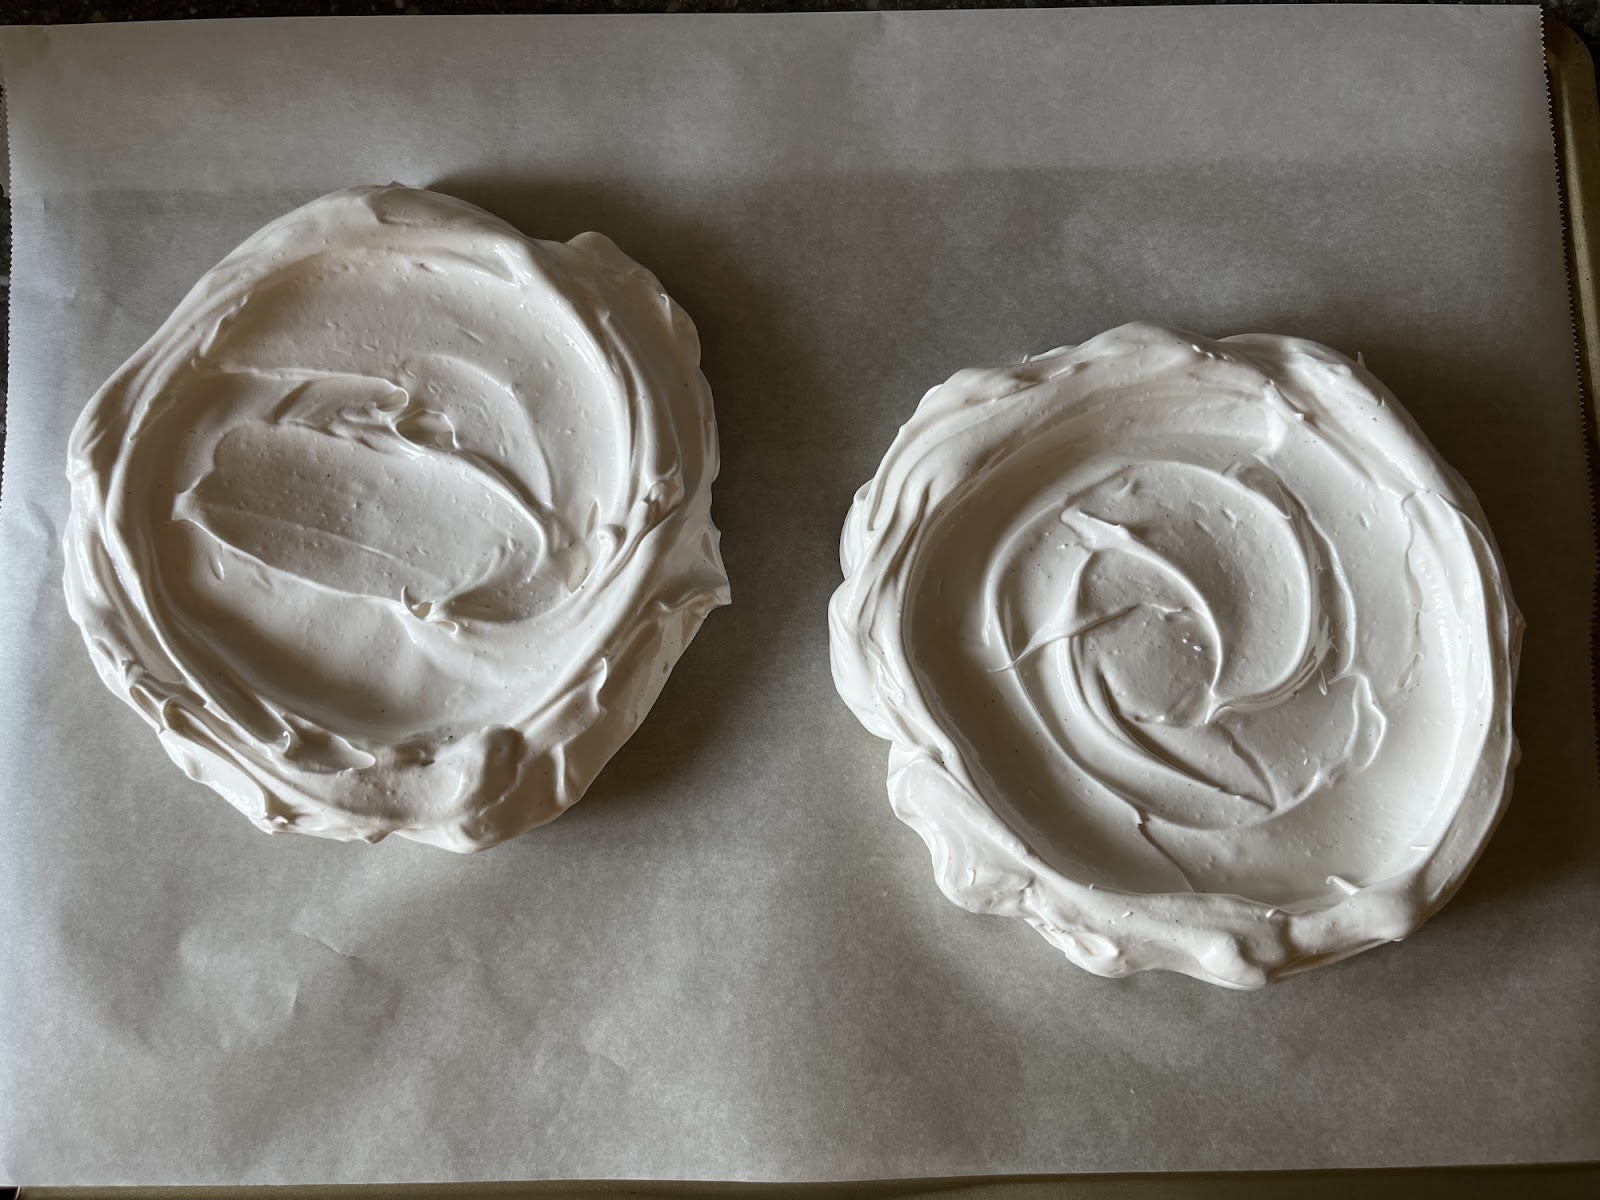
Scoop half of the mixture onto one side of the parchment-lined pan, and using the back of a spoon, spread it out to make a 6 to 7 inch circle. Make the edge slightly taller than the center portion. Repeat with remaining mixture so you end up with two pavlovas.

Place the pan in the oven and then immediately reduce the heat to 200 degrees Fahrenheit. Leave the oven door closed and bake until the pavlova is firm and dry, about 90 minutes. 

Turn off the oven and allow the pavlovas to cool inside the oven. 

Move the baked pavlovas to a cooling rack and allow to come to room temperature. 

Meanwhile, whip the heavy cream with the sugar.

Divide the whipped cream between the two pavlovas and use a spoon to spread the whipped cream over the top op the pavlova, leaving about an inch around the edge uncovered. 

Divide the berries between the two pavlovas and spread/pile over the whipped cream.

Serve immediately. Cover and refrigerate any leftovers. 


Before baking

Baked


Monday, July 24, 2023

Corn Salad


My good friend Amy made this for us one summer evening, and my husband who doesn't really go out of his way for veggies LOVED it. (I know corn is more of a grain than a vegetable, but we grew up in the 70s and our moms counted it as a vegetable.)
It's a light, refreshing, and flavorful salad. I still need to perfect it, but since I keep going back to my texts to get the recipe, I'm finally committing it to the blog. I'll try to remember to make changes here as I adjust the recipe. What Amy sent me was not an exact recipe, so the way I quantified it here is me ballparking it.

Corn Salad

Ingredients:
  • 4 large corn cobs, grilled & cooled/refrigerated 
  • 1 cucumber, peeled, seeded, and diced
  • 1/3 cup finely diced red onion
  • 2-3 tablespoons fresh finely diced jalapeƱo pepper
  • 1/4 cup (or so) cilantro, chopped
  • juice of one small lemon
  • 1/2 to 1 tsp salt
  • 1 teaspoon chili powder
Instructions:
  • (Watch this video if you want to see how one person grills corn.)
  • Carefully cut the corn kernels from the cob and place in a large bowl. (Watch this video for corn cutting tips.)
  • Add the rest of the ingredients, starting with only 1/2 teaspoon salt. Mix thoroughly.
  • Taste to see if you want to add more salt (or any other ingredient). 
  • Cover and refrigerate until ready to serve.

Makes about 6-8 cups of corn salad.

Wednesday, June 30, 2021

Copycat Luxardo Maraschino Cherries & Syrup


Homemade Maraschino Cherries and Cherry Jam


Luxardo Maraschino Cherries are something special. They're a deep purple color, and the syrup they come in is way more flavorful than any other Maraschino cherry syrup I've ever tried. I don't really like EATING Maraschino cherries, so I don't exactly know if I LIKE eating the Luxardo cherries, but everyone else who's ever tried them swears they're like candy.

I tasted these ones you see pictured here. They are sour and boozy, and have the cinnamon and nutmeg flavors in them. I need to give some to others to try and tell me if they're really good.
All I know is that although the syrup is much lighter in color than the original Luxardo cherries, it tastes just as delicious in the Cherry Limeade beverage I usually enjoy it in.

If you enjoy reading details and variations on the recipe, please go to A Nerd Cooks where I found this recipe. The article is fascinating and informative.

Copycat Luxardo Maraschino Cherries and Syrup
  --Adapted from A Nerd Cooks


Ingredients:
  • 1 cup granulated sugar, divided
  • 1/2 cup water
  • 2 pinches kosher salt
  • 2 cinnamon sticks
  • 1/2 teaspoon freshly grated nutmeg
  • 2 cups Luxardo Maraschino Liqueur
  • 1 to 1.5 pounds sour cherries, pits and stems removed
Instructions:
  • Have about 5 8-ounce mason jars cleaned and sterilized ready.
  • In a large saucepan, add 1/2 cup sugar, water, salt, cinnamon sticks and nutmeg. Place saucepan over medium high heat and swirl or stir until sugar is melted.
  • Add the cherries and liqueur. Stir. Bring mixture to a simmer.
  • Ladle the cherries out of the syrup and into the waiting mason jars. Try not to include too much of the syrup at this point.
  • Remove the cinnamon sticks. Add 1/2 cup sugar to the syrup, stir, and continue to cook to reduce the liquid to almost half.
  • Pour syrup over cherries until syrup and cherries reach about 1/4 in from the rim of the jar.
  • Screw the lids onto the jars, not super tight, but securely. Process the jars in boiling water for 3 minutes. Then carefully remove to a place to cool completely.

These cherries are actually from a cherry tree in my yard.

I bought fresh spices for the occasion from our local All Spice in Des Moines, Iowa.

Sugar is all dissolved. Time for the cherries and liqueur.

Cherries swimming in Luxardo Maraschino Liqueur

I thought they looks an awful lot like grape tomatoes.

I'm mostly after the syrup here, so there's extra.

Cherry Vodka Limeade


Sunday, August 11, 2019

Strawberry Milk

Strawberry Milk


I made this recipe up several years ago one night when I was hungry but didn't want to eat food food because it was too late, and I didn't want that ate-too-late-stomach-ache.

It's refreshing, satisfying, and just filling enough. It tastes similar to Nestle Strawberry Quik, but without that artificial flavor aspect--tastes like fresh strawberries.

I'm not even a huge strawberry fan, but for some reason, every once in a while, this hits the spot.

Strawberry Milk

Ingredients:

  • 1/2 cup (approximately) frozen sliced strawberries
  • 2-3 teaspoons sugar (depending on how sweet you like your milk)
  • 1 cup milk (I used 1%)
  • 1/4 teaspoon vanilla extract (optional)
Instructions:

Place all ingredients in a blender or a tall plastic cup (if you're using a hand blender). Blend until strawberries are completely pureed into the milk.

Pour into a glass and drink with a straw.

Makes 1 serving

Recipe is easily doubled

Sunday, June 18, 2017

Roasted Broccoli


Delicious roasted broccoli


I needed a new way to prepare broccoli tonight, and Pinterest did not let me down. Everyone loved this, and now I'm wondering why we all tolerated simply steamed broccoli for so long.
The broccoli turned out mostly cooked, but still crunchy, and very flavorful. I may like broccoli again.

Roasted Broccoli
       Adapted from A Spicy Perspective

Ingredients:
  • 1 bunch broccoli
  • 1 1/2 tablespoons olive oil
  • 1/8 teaspoon garlic powder 
  • 1/3 teaspoon salt
  • 1/4 teaspoon fresh ground black pepper
Instructions:
Preheat oven to 475 degrees Fahrenheit.
Line a small baking sheet with parchment paper.
Mix the garlic powder, salt, and pepper in a small bowl.
Wash, trim, and cut broccoli into bite-size pieces. Cut and peel stalk as well, if desired.
Pile broccoli onto the prepared baking sheet.
Drizzle olive oil over broccoli, and then sprinkle with garlic powder, salt and pepper mix. Toss with hands and spread evenly over the surface of the pan.
Roast at 475 degrees for about 15 minutes, or until edges start to look a bit charred.
Makes about 3-4 servings


Monday, May 29, 2017

Heidi's Bacon Green Beans

 
Mmm. Bacon Green Beans.


My sister-in-law Heidi can COOK. Every time I eat at her house I come away with a new recipe or five. This one has quickly become one of my favorites that is currently a weekly side dish at my house. I'm not sure if my family loves these as much as I do, but I don't care. Even as leftovers these green beans are heavenly. Must be the bacon.

The high heat on these beans makes them a little charred on the outside, and the salty bacon along with the fabulous savory flavor of the shallots make this a fabulous sensory experience. Even if you're not a fan of green beans in general, you might like these. And they're easy. So easy.

I use the meat counter slab bacon for these green beans. My brother pointed out to me that bacon is really cheaper that way, and it's a thicker cut, so it feels meatier AND it doesn't burn with the high heat in this application.

Heidi's Bacon Green Beans

Ingredients:
  • 4-5 cups of washed and trimmed fresh green beans (I also like to cut them in half)
  • 4-5 strips of thick cut bacon, cut into 1/4 inch strips (crosswise, not lengthwise)
  • about 1/4 teaspoon salt
  • 2 tablespoons finely chopped shallots
Instructions:
  • Place a large cast iron skillet on the stove and turn the burner to medium high. Add bacon before the pan gets hot.
  • Stir bacon until is just starts to render some fat.
  • Add the green beans and continue to stir over medium high heat until green beans have some dark, almost burned spots. 
  • If bacon seems to be crisping up too soon, you can remove some of it, or turn the heat down a little.
  • Sprinkle with salt and shallots, cooking another minute or so after the beans seem done.
  • Transfer to a serving bowl and serve.
Makes about 6 servings


Sunday, July 5, 2015

Spicy Creamed Corn

Spicy Creamed Corn

Last weekend our friends got married and had their reception catered by Woody's Smoke Shack here in Des Moines. All of it was absolutely delicious, from the brisket to the cornbread. In the middle (of the buffet table) was this amazing creamed corn. (Not THIS cream corn here--sorry.) It had actual cream in it and what looked like little pools of butter. There was a bit of an orange-ish tinge to it and it was subtly spicy, so I think they put in cayenne pepper. 
At any rate, it made me want more. For some reason I'm yet unaware of, most BBQ places out here in the Midwest are closed on Sunday. We figured that out the hard way when we drove to Kansas City one Sunday afternoon for BBQ, and found that almost all of the awesome places we went for were closed. Sigh. So, in order to get my spicy creamed corn, I had to make it myself today. I really just made this up and will have to try again once I have Woody's again, but for now, this satisfied my craving.
I added probably too much spice to mine, so if you're not a fan of spicy, back off of the cayenne and jalepeno. If you decide to omit both of those completely, I suggest you at least add a little black pepper to it. This creamed corn is sweet, salty, spicy, and creamy. Lots of good textures and flavors going on here. Come sweet corn season next month, I will try a fresh sweet creamed corn. Stay tuned.

Spicy Creamed Corn

Ingredients:
  • 2 tablespoons onion, finely chopped with a few seeds
  • 4 tablespoons butter, divided
  • 2 cups frozen sweet corn kernels
  • 1 small can cream style corn (8.25 oz.)
  • 1 to 2 tablespoons jalepeno, finely chopped (depending on desired level of heat)
  • 1/8 to 1/4 teaspoon cayenne pepper (depending on desired level of heat)
  • 1/8 teaspoon paprika
  • 1/2 teaspoon salt
  • 1 tablespoon sugar
  • 1/2 cup heavy cream
  • 1/2 teaspoon cornstarch mixed with 2 teaspoons water
Instructions:
In a medium saucepan over medium heat, melt 2 tablespoons of the butter and add the chopped onions. Saute onions for a few minutes until translucent. Add the frozen corn, canned cream corn, jalepeno, cayenne, paprika, salt, sugar, and cream. Mix and bring to a boil over medium heat. When mixture is boiling, add the cornstarch and water mixture while stirring corn mixture. Reduce heat to low and simmer for 20-30 minutes.
Makes about 4 servings


Tuesday, April 21, 2015

Pico de Gallo


Pico de Gallo is a staple condiment in the world of Mexican cuisine. It adds freshness and a little acid to whatever you serve it with, but usually it has no heat. For my first attempt ever making this (don't know what took me so long) I added just half of a de-veined and de-seeded serrano pepper--and I can't sense any heat in it at all. So if you want heat, add more pepper, or include some of the seeds.
I wish I had something exciting to say about this recipe, but I don't. It's a solid pico de gallo recipe that I'll be using again. Maybe I need to go eat some more with some chips... I had some with my White Chicken Chili tonight, but haven't really eaten it to just get the pico taste.
So there you go. Sorry. This is not an example of my best writing, but the recipe is good. Try it anyway.

Pico de Gallo

Ingredients:
  • 1/2 white or red onion, finely diced
  • 3 medium to large size Roma tomatoes, washed, dried, and diced
  • 1 small handfull cilantro leaves, washed, dried, and chopped
  • 1/2 serrano pepper, de-veined, de-seeded, and very finely chopped
  • 1 tablespoon fresh lemon juice
  • 1/8 teaspoon garlic salt
  • 1/8 teaspoon kosher salt
Instructions:
Mix all ingredients in a medium size bowl. Cover and refrigerate for about an hour before serving. 

Serve with White Chicken Chili, Tortilla Chips, Tacos, Taquitos & Flautas, Burritos, or any other Mexican food you think it would go with nicely.

Makes about  1 1/2 to 1 3/4 cups 

White Chicken Chili with rice and Pico de Gallo

Wednesday, May 21, 2014

Grape Juicy Smoothie

Grape Juicy Smoothie
I'm still having a smoothie and popcorn for breakfast most mornings, and I've also been buying Welch's Grape Juice lately too. When I ran out of orange juice concentrate the other day for my normal smoothie, I subbed some grape juice. It made the whole thing taste like grape juice to me--which is a GREAT thing. 
Ever since I was a small kid, I've adored grape juice, but it was a rare treat for us. I usually only got it on field trip days. It came in these tiny cans with a foil tab top, and I think I remember that juice more than I remember the actual field trips. More evidence of me being a foodie from the beginning. Then there was the occasional communion grape juice. That's it. Grape juice was a magical (and apparently expensive) treat. Lately I've been enjoying it in my smoothie every morning, and it still tastes special.
If you're a grape juice fan, try this out. I think you'll love it as much as I do.

Grape Juicy Smoothie

Ingredients:
  • 5-6 large whole frozen strawberries
  • 1/3 cup frozen mixed berries
  • 1/2 cup Concord grape juice
  • 1 tablespoon whole chia seeds
  • 1/2 medium size ripe banana, sliced
  • 2 oz. Greek yogurt (I used AE raspberry flavor)
  • 2 oz. vanilla yogurt
  • 1/2 to 3/4 cup water
Instructions:
In a tall plastic cup, place all of the ingredients in the order listed.  Fill with enough water to just cover the top of the fruit.  You can always add more water to thin it out later.  With your immersion blender in hand (I use my Braun Hand Blender), push down into the cup as far as you can and then start the blender.  Blend gently with up and down motions, pushing down on the frozen fruit to break it up.  After you've gotten the blender to the bottom, keep blending for another 30 seconds or so, moving the blender up and down until you have a smoothie texture. Add more water & blend if the smoothie seems to thick.  Pour into a glass with a straw and enjoy!

Makes one large or two small servings


Tuesday, April 1, 2014

Fried Zucchini (Gluten Free)

Gluten Free Fried Zucchini


Lately I've had a craving for fried zucchini. In California, Carl's Jr. sells these, and I usually get those instead of fries to go with my Charbroiled BBQ Chicken Sandwich. I live in Iowa now, though, so although we have a fast food restaurant with the same happy star logo, we do NOT have fast food fried zucchini. Sigh.
So, today, I decided to just make some myself. I'm attempting to go gluten free these days, so I made the bread crumbs with the Gluten Free French Sandwich Rolls I make weekly for my son. I also made sure to make fresh Hidden Valley Ranch Dressing because it's the best. I did not want to chance being dissatisfied with my fried zucchini. I was already unsure I could pull off something that would satisfy my craving.
Well, it all worked out beautifully, and I think I'm just calling this experiment "dinner" for tonight because I ate SO MANY. Ugh. So satisfying, though. They were crunchy, hot and tender on the inside, and with the ranch dressing...oh my goodness. Just what I was shooting for. Because of the seasoning and the frying, I can't even tell that these are gluten free. That doesn't make them any healthier, but I don't care about that today. Nope, today I have satisfied a craving that Hardees could not.
I looked up several fried zucchini recipes, but didn't follow one in particular, so I'm not putting in a "adapted from" line. Maybe I'm growing up. Or maybe I'm just too lazy to mention all of the websites/blogs I looked at today. At any rate, give thse a try. You will not be disappointed.

Fried Zucchini

Ingredients:

  • 1 pound (2 medium) zucchinis
  • 1/2 cup Better Batter Gluten Free All Purpose Flour
  • 1/4 teaspoon salt
  • 2 eggs, beaten
  • 2 cups gluten free bread crumbs (2 Gluten Free French Sandwich Rolls made into crumbs in a food processor)
  • 1/2 teaspoon Italian seasoning
  • 1/4 cup grated (powdery) Parmesan cheese
  • 1/8 teaspoon fresh ground pepper
  • 1 inch canola oil in a high-rimmed frying pan
  • salt to taste

Instructions:
Wash and trim the ends off the zucchinis. Cut zucchinis into 1/4- inch circles (I used a wavy cutter for this). Set aside.
Mix the flour and 1/4 teaspoon salt in a small shallow dish.
Beat the eggs and place in another small shallow dish.
Mix the bread crumbs, Italian seasoning Parmesan cheese, and pepper in a medium shallow dish.
Working with about three zucchini circles at a time, dredge circles in the salted flour and shake off excess flour.
Dip in the egg, and then place on the bread crumbs. Gently cover zucchini circles with crumbs and pat gently. Turn each circle over and do the same to ensure a nice coating. Place coated circles in a single layer on a clean cookie sheet.
Repeat with remaining zucchini circles.
Line a cooling rack with paper towels.
Heat oil to 375 degrees Fahrenheit. Using a fork, carefully place zucchini circles in the oil, being careful to not crowd them. Fry until a nice medium golden brown color on both sides. Remove fried zucchini to paper towels to drain and cool. Continue frying the remaining zucchini.
Serve with fresh ranch dressing.
Makes about 4 servings


Sunday, December 22, 2013

Brussels Sprouts, Zucchini, & Onions

Brussels Sprouts, Zucchini, & Onions

I don't really like veggies all that much. I say that, but whenever I have well-prepared veggies, I love them. Usually that happens at restaurants, and sometimes in the homes of friends or family. The first time I tried brussels sprouts was at the home of my brother and his wife when they lived in England. Heidi made the Brussels sprouts as a side dish to a fantastic Christmas dinner. I honestly don't recall the main dish (sorry, Heidi), but I do remember the roasted potatoes and the Brussels sprouts. I was shocked at how delicious these tiny green cabbagy things tasted. But of course, I never made them on my own, my excuse being that my husband would never eat them.
Fast forward about 13 years, and my husband and I finally tried this little restaurant in the Beaverdale neighborhood of Des Moines, Iowa. It's right down the street from us, but the name, the Flying Mango, elicited images of mango chutney and weird Latin fusion cooking. Mangos, I guess. Anyway, when we finally went there, I realized it did not involve mangoes, or chutney, or Latin food. They have a pretty interesting menu, but the only thing I've tried is the 24-hour brisket sandwich, served on a ciabatta roll (sooooo good), with a side. Their vegetables change daily, I think, and I was lucky enough to go on two days they had these Brussels sprouts. One time they had a few julienned carrots, and the last time was julienned red peppers, but I think they do that mainly for color. Since these ones were made in a hurry, I didn't embellish them with a colorful veggie.
I didn't have the courage to ask them for the recipe, but what I've made here it pretty darned good. I think I need to cook them a little less time next time, but I don't even know when that will be because I think I'm the only person in the house who will eat this. Sigh. Tonight I got to share the dish you see pictured with my husband's family for our Christmas celebration. I'm sure I can scale it down for just me, and I probably will, because, contrary to popular belief, Brussels sprouts are in fact yummy.

Brussels Sprouts, Zucchini, & Onions

Ingredients:

  • 1 1/2 pounds fresh brussels sprouts
  • 1 medium zucchini (about 1 cup cut)
  • 1/2 medium onion
  • 1 tablespoon canola oil
  • 2 tablespoons butter
  • 1 to 1 1/2 teaspoons salt

Instructions:
Trim the ends of the brussels sprouts, pealing off the wrinkled layers of each one. Then cut each sprout in half lengthwise. Place cut sprouts in a colander and rinse with cold water.
Wash and cut the zucchini, trim off the ends, quarter it, and then slice each quarter into quarter-inch slices. Set aside.
Slice the half onion lengthwise into thin julienned strips.
Place the sprouts in a steamer with the bottom containing salted water. Salt the sprouts lightly as well. Steam the sprouts, covered, on high heat for about 3-4 minutes, or until a sharp knife inserted meets just slight resistance. Then add the zucchini, salt again lightly, cover, and steam for another minute or two. 
Remove veggies from the bottom of the steamer and rinse with cold water to stop the cooking. Set aside while you cook the onions.
I emptied my steamer bottom of water and put it back on medium heat. Add the canola oil and the butter. When butter is melted, add the onions and sprinkle with a little more salt. Cook onions until they are soft, but not caramelized, about 5-6 minutes. If they are browning too much, reduce the heat a little bit.
When onions are soft, add the sprouts and the zucchini, stir and toss to mix all three veggies and to heat them all through. 
Makes about 8 servings

Sunday, August 25, 2013

Spinach Wheels


Spinach Wheels


I could say a lot about these things, but I'm not feeling very inspired with words this morning, so I'll just say I made these spinach wheels today because it's my son's 11th birthday, and he LOVES them. He just ate a bunch for breakfast. Have I mentioned that he's my eating buddy?

At any rate, these aren't only great for breakfast, they're a great appetizer to take to a potluck or to a friend's house. They're soft, salty, flavorful, and just plain sinful, really. I hardly make them any more because of the fat and sodium in them. I suppose you could sub Greek yogurt for the sour cream, and reduced calorie mayo for the regular, but I just don't think they'd be as good. I'd rather have full fat once every year or two than slightly reduced fat more frequently. That's just the way I roll. (A couple of puns intended.)

Spinach Wheels

Ingredients:
  • 1 cup sour cream
  • 1 cup mayonnaise
  • 1 pkg Hidden Valley Ranch dressing/dip powder
  • 2-3 green onions, chopped
  • 1/2 jar bacon bits or Bacos (about 1.5 ounces)
  • 2 pkg (10 oz. each) frozen chopped spinach, thawed and squeezed dry
  • 6-8 large flour tortillas (burrito size)
Instructions (See TikTok video below as well):
  • In a medium or large bowl, mix the sour cream, mayonnaise, ranch powder, green onions, and bacon bits. Add the spinach and mix thoroughly, making sure to completely mix in any squeezed chunks of spinach.
  • On a flat surface, lay a square sheet of plastic wrap and place one tortilla on top of it. Spread a thin, even layer of the spinach mixture over the tortilla, and then gently roll into a long cylinder. Wrap the cylinder well in the square of plastic wrap. Set on a pan/plate and repeat with remaining tortillas and spinach mixture.
  • Refrigerate rolls for 2-24 hours (if you're using Bacos they need some more time to soften than just two hours).
  • Unwrap a cylinder, and with a sharp knife, cut into 1/2" to 3/4" thick wheels. Eat the ends that don't make wheels, because they won't look good plated and because you need to know what they taste like.
  • Plate up the wheels. Cover and refrigerate until ready to serve.

Makes 48-64 wheels, depending on how large your tortillas are.


Thursday, July 18, 2013

Berries and Yogurt Breakfast


Today is the day after our summer in California. In California we stay at my parents' house, and if you've followed this blog long enough, you know that my mother is the original food pusher in my life. She loves to stock her house with yummy things that she knows we all love, like chips, and sourdough bread, and ice cream Drumsticks, and Dove Chocolate. Okay, maybe I was the one to buy the Dove chocolate when I got there. I was also the one baking and cooking daily to fatten my family up. 
At any rate, I decided to turn over a new leaf when I got back home. I was doing great until about 1:30, when I got really hungry. But before 1:30, around 10:00, I had this for breakfast. It is inspired by both my Star Spangled Cheesecake and McDonald's Fruit and Yogurt Parfait. I've loved the parfait for a long time, and I knew it was simple--just vanilla yogurt, strawberries, blueberries, and granola. As for the cheesecake, it was the first time I've actually paired fresh fruit with this type of cheesecake, and I loved it so much that I kept wanting to make it while in California. I never got around to it, and now that I'm turning over my new leaf (sort of), I need to put that notion away. This dish here is my happy solution to my craving.
If you've ever tasted the parfait at McDonald's, you know what this tastes like. I don't even think I really need to write out a recipe, but since I have a food blog and all, I decided to just post about it. I used Anderson Erickson (a local Des Moines dairy) French Vanilla Bean Yogurt, fresh berries, and Target's Simply Balanced Honey Almond Flax Granola.  It was absolutely delicious. The perfect breakfast. Now I just need to figure out a reasonable lunch that will satisfy so I don't end up dipping into the chip bag...

Berries and Yogurt Breakfast

Ingredients:
  • 1 cup fresh berries (blueberries and strawberries for me today)
  • 6 ounces low fat vanilla yogurt
  • 1/4 cup granola cereal
Instructions:
Rinse berries under cold water and place on a clean paper towel. Pat berries dry, cut strawberries into bite-size pieces, and place berries in a cereal bowl. 
Scoop the yogurt over the berries and then top with the granola.

Makes 1 serving


Monday, June 10, 2013

Yummy Dill Dip

Dill Dip
I'm sure my mom got this recipe from someone else, but I got it from her, so I'm giving her credit. This is a fabulous, and I mean fabulous dip that goes with just about anything you want to dip: veggies, pretzels, potato chips, tortilla chips. It's a nice change from the typical ranch dip, and the way I make it here it's pretty salty, which I probably shouldn't enjoy so much, but I do. The original recipe calls for Bon Appetit Seasoning, but since I didn't have that, I just used celery salt, and it tastes just fine.
Enough said. Try it. It's delicious.

Dill Dip

Ingredients:
  • 1 cup sour cream
  • 3/4 cup mayonnaise
  • 1 tablespoon dried parsley flakes
  • 1 tablespoon dried dill weed
  • 1 tablespoon dehydrated minced onion
  • 1 teaspoon celery salt (or Bon Appetit Seasoning)
  • 1/8 teaspoon garlic salt
  • 1/8 teaspoon salt (optional)
Instructions:
In a medium bowl, mix all of the ingredients until combined. Cover the bowl and refrigerate for at least an hour until ready to serve. Refrigerate any leftovers.
Serve with fresh cut vegetables, chips, or pretzels.

Makes 1 3/4 cup dip


I may have added too much salt to this batch...


01 09