Showing posts with label Other Sweets. Show all posts

Thursday, October 19, 2023

Salted Caramel Sauce


Salted Caramel Sauce


This here has to be one of my favorite recent recipes. I started making cold brew coffee recently, and this is what I've been using to sweeten it. And I also eat it by the spoonful on occasion. It tastes like See's Candies Butterscotch Lollipop in liquid form. Just delightful.

If you've never worked with molten sugar before, please be extra careful, and watch the video below to see the process. It's not a difficult recipe, but working with melted sugar is always  somewhat delicate and dangerous. 

I haven't tried it yet, but I'm sure this sauce would taste great on ice cream or the Butterscotch Pots de Creme that I have posted here on the blog. In any case, if you enjoy salted caramel, you'll love this recipe.

Please note that there's a very fine line between flavorful and burnt caramel, so if you're trying this for the first time, err on the side of a lighter-colored caramel. Once you get the feel of it, you can risk going a little darker the next time--because there WILL BE a next time.

Enjoy!

Salted Caramel Sauce

Ingredients:
  • 2/3 cup heavy cream
  • 1/2 cup white sugar
  • 1/4 teaspoon sea salt
Equipment/Tools:
  • clean & warm 1/2 pint mason jar
  • heavy-bottomed saucepan
  • small saucepan
  • wire whisk
  • silicone spatula
  • measuring cups and spoons
Instructions:
  • Place cream in the small saucepan over low heat. Once it's hot, you can turn it off. Keep an eye on it to make sure it doesn't boil.
  • Place the clean mason jar on the stove to stay a little warm while you make the caramel sauce.
  • Pour the sugar into the large saucepan set over medium heat.
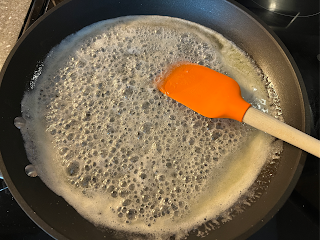
  • It will take a while, like 5-8 minutes before you start seeing the sugar start to melt. When you start seeing melted patches, start gently swirling the pan to evenly distribute the sugar and prevent any burned spots. 
  • Continue melting and swirling the sugar until it's a deep amber color. Once it's deep amber, remove from the heat and pour in about half of the cream, which will bubble up violently. 
  • Whisk the sugar and cream together, making sure to get any sugar in the corners of the pan. 
  • Whisk in the remaining cream, and then the salt. Whisk until smooth, again paying attention to the corners of the pan. 
  • Pour the caramel sauce into the mason jar, scraping all the goodness in using a silicone spatula. 
  • Allow the caramel to cool enough to touch the jar without hurting yourself, put the top on the jar (not too tight), and allow to cool completely before placing in the refrigerator.
  • Use in your coffee or enjoy by the spoonful.
Makes about 1 cup of sauce


Monday, December 12, 2022

Cinnamon Toffee Almonds


Cinnamon Toffee Almonds

These tasty nuts are just a variation on the butter toffee pecans two posts ago. I decided to make them after finally giving up on finding the Salted Caramel Churro Almonds that had been available at Sam's Club earlier this year. They have been out of stock for months now. 
This recipe here is not exactly as I remember the Sam's Club almonds, but they're delicious nonetheless.
Next time I will probably use fewer almonds than I did this time (I used more than noted in the recipe below) because I just don't think mine had enough of the toffee coating. I will also use more cinnamon, as I went conservative with the ones pictured, using only 1/2 teaspoon of ground cinnamon. 

Cinnamon Toffee Almonds

Ingredients:
  • 3 tablespoons butter
  • 3/4 cup white sugar
  • 1/4 cup water
  • 2 cups raw almonds
  • 1/2 teaspoon kosher salt (I used Morton brand)
  • 1/2 to 1 teaspoon ground cinnamon (amount depends on your preferred level of cinnamon)
Instructions:
  • In a small bowl, combine the salt and cinnamon, and set aside. Then line a cookie sheet with parchment paper and also set aside.
  • In a large non-stick pan/skillet over medium heat, melt the butter.
  • Add sugar and water and stir with a silicone spatula to combine.
  • When the liquid starts to simmer and all of the sugar is melted, add the nuts.
  • Stir continually until all water is evaporated and the sugar starts to looks crusty.
  • Sprinkle the salt & cinnamon mixture evenly over the nuts and then stir.
  • Continue to stir until sugar starts to look a bit shiny on the outside of the nuts--it will not get completely shiny (see pics below for reference).
  • Pour nuts onto the prepared cookie sheet and separate the nuts as much as possible with the silicone spatula or other heat-proof utensil.
  • Allow nuts to cool completely before enjoying. Nuts will get crunchier as they cool.
  • Store in an airtight container.

Makes about 2 1/2 cups


Sugar is melted and ready for nuts.


Add salt & cinnamon when nuts look like this.


Wednesday, June 30, 2021

Copycat Luxardo Maraschino Cherries & Syrup


Homemade Maraschino Cherries and Cherry Jam


Luxardo Maraschino Cherries are something special. They're a deep purple color, and the syrup they come in is way more flavorful than any other Maraschino cherry syrup I've ever tried. I don't really like EATING Maraschino cherries, so I don't exactly know if I LIKE eating the Luxardo cherries, but everyone else who's ever tried them swears they're like candy.

I tasted these ones you see pictured here. They are sour and boozy, and have the cinnamon and nutmeg flavors in them. I need to give some to others to try and tell me if they're really good.
All I know is that although the syrup is much lighter in color than the original Luxardo cherries, it tastes just as delicious in the Cherry Limeade beverage I usually enjoy it in.

If you enjoy reading details and variations on the recipe, please go to A Nerd Cooks where I found this recipe. The article is fascinating and informative.

Copycat Luxardo Maraschino Cherries and Syrup
  --Adapted from A Nerd Cooks


Ingredients:
  • 1 cup granulated sugar, divided
  • 1/2 cup water
  • 2 pinches kosher salt
  • 2 cinnamon sticks
  • 1/2 teaspoon freshly grated nutmeg
  • 2 cups Luxardo Maraschino Liqueur
  • 1 to 1.5 pounds sour cherries, pits and stems removed
Instructions:
  • Have about 5 8-ounce mason jars cleaned and sterilized ready.
  • In a large saucepan, add 1/2 cup sugar, water, salt, cinnamon sticks and nutmeg. Place saucepan over medium high heat and swirl or stir until sugar is melted.
  • Add the cherries and liqueur. Stir. Bring mixture to a simmer.
  • Ladle the cherries out of the syrup and into the waiting mason jars. Try not to include too much of the syrup at this point.
  • Remove the cinnamon sticks. Add 1/2 cup sugar to the syrup, stir, and continue to cook to reduce the liquid to almost half.
  • Pour syrup over cherries until syrup and cherries reach about 1/4 in from the rim of the jar.
  • Screw the lids onto the jars, not super tight, but securely. Process the jars in boiling water for 3 minutes. Then carefully remove to a place to cool completely.

These cherries are actually from a cherry tree in my yard.

I bought fresh spices for the occasion from our local All Spice in Des Moines, Iowa.

Sugar is all dissolved. Time for the cherries and liqueur.

Cherries swimming in Luxardo Maraschino Liqueur

I thought they looks an awful lot like grape tomatoes.

I'm mostly after the syrup here, so there's extra.

Cherry Vodka Limeade


Saturday, April 10, 2021

Almond Croissants the Easy Way

Almond Croissants


After discovering how easy it is to make almond brioche, I decided to use the almond cream on some Sam's Club croissants to create some almond croissants. I can't even tell you how amazing these things are. Sweet, buttery, crispy, soft, decadently delicious. The fact that they are so easy makes them dangerous to anyone trying to eat healthy. Just so you know.

Give these a try. If you like almond croissants at all, you'll thank me.

Almond Croissants
--Adapted from Oh Crumb!

Ingredients:
  • 5 tablespoons butter
  • 1/3 cup granulated white sugar
  • 1/3 cup packed light brown sugar
  • 3/4 cup almond flour (from blanched almonds)
  • 2 tablespoons all purpose flour
  • 1 teaspoon cornstarch
  • 1 large egg
  • 1 teaspoon almond extract
  • 1/4 to 1/2 teaspoon vanilla extract
  • 7 large croissants
  • 1 cup (approx) sliced almonds, toasted
  • powdered sugar
Instructions:
  • Preheat oven to 350 degrees Fahrenheit and line a baking sheet with parchment paper.
  • In a stand mixer fitted with a whisk attachment, mix the butter with the white sugar and brown sugar until smooth.
  • Add the almond flour and mix until incorporated.
  • Add cornstarch and flour and mix until incorporated.
  • Add egg and almond and vanilla extracts and mix on medium speed until completely incorporated.
  • Slice each croissant in half horizontally.
  • Spread about 1 1/2 to 2 tablespoons of the almond cream onto the bottom half of a croissant, close the croissant, and then spread another 1 1/2 to 2 tablespoons of almond cream all over the top of the croissant. Repeat with remaining croissants.
  • Press about 2 tablespoons of sliced almonds evenly on the top of each croissant and press lightly so almonds stick.
  • Bake at 350 degrees for about 15 minutes, or until almond cream is bubbled is starting to brown along with the sliced almonds.
  • Slide parchment onto a cooling rack and allow to cool for at least 5 minutes before sprinkling with some powdered sugar.
  • Tastes best after cooled to room temperature.
  • Refrigerate any leftover almond cream and seal leftovers in an airtight container or zip top bag.
Makes 7 large croissants


Finished almond cream


Cinnamon Raisin Bagels


I'm not a big fan of sweet bagels, but my husband is, so I made these for him. They're good--for a sweet bagel, and my husband remarked, "Wow. These are the real deal." As if I don't always produce real deal baked goods. Psh. 

At any rate, this is a good, solid cinnamon raisin bagel recipe that I found at Food52.com. I made a couple of adjustments, but I don't know that I made them taste much different that they would have been had I followed the recipe to a T. 

At this point I'm just typing this intro because it's what I do. Try the recipe. It's good. 


Cinnamon Raisin Bagels
    Adapted from Food52.com

Ingredients:
  • 3 to 3 1/2 cups King Arthur Unbleached All Purpose Flour, plus more for dusting
  • 1/2 cup King Arthur Whole Wheat Flour
  • 2 1/4 teaspoons instant yeast
  • 2 tablespoons sugar
  • 2 teaspoons salt
  • 1 teaspoon ground cinnamon
  • 1 teaspoon non-diastatic malt powder
  • 1 1/2 cups water (room temperature)
  • 1 1/2 teaspoons vanilla extract
  • 1/2 teaspoon oil
  • 1/2 cup raisins
  • 2 tablespoons cinnamon sugar
For boiling:
  • 2 quarts water
  • 1 tablespoon sugar
  • 2 tablespoons non-diastatic malt powder
Instructions:
  • In a large mixing bowl, place the flours, yeast, 2 tablespoons sugar, cinnamon, salt, and non-diastatic malt powder and mix thoroughly. Add water and vanilla and mix until dough is a cohesive mass. Turn out onto a lightly floured surface and knead until smooth and elastic (8-15 minutes). Dust kneading surface lightly with flour as needed to keep dough from sticking. When dough is about done being kneaded, flatten it out and spread surface with the raisins. Knead the raisins in until evenly distributed (I didn't get mine super evenly distributed, but it was fine.)
  • Form dough into a ball. Put oil in to a clean bowl, put the dough ball in and shake and turn dough ball to coat with oil. Cover and allow to rise either at room temperature for about an hour or in the refrigerator for 4-8 hours.
  • Line a baking sheet with parchment paper.
  • Once dough has risen, turn out onto a clean work surface. Cut dough into 8 equal wedges. Flatten a wedge of dough; fold the long tip of dough onto itself and flatten into a rough rectangle (see pics below). Sprinkle with a little cinnamon sugar (half teaspoon or so). Roll the rectangle into a long, fat rope, pinching the seam to seal. Repeat with remaining dough pieces.
  • Preheat oven to 425 degrees Fahrenheit. Place the 2 quarts water with 1 tablespoon water and 2 tablespoons non-diastatic malt powder into a wide-topped pot (like a Dutch oven)  to a gentle boil over medium to medium-high heat.
  • Roll each rope to about 11-12 inches in length, tapering at the ends. Twist the tapered ends together to form a ring shape, pinching to connect the ends. Put your fingers through the center and roll the seam between your hand and the work surface to seal the ends together. 
  • Place formed bagels onto the parchment lined baking sheet. Cover loosely with plastic wrap or a clean plastic grocery bag. Allow to sit at room temperature for about 20 minutes or refrigerate if you won't be ready until later.
  • Place 2-3 bagels in the boiling water at a time, boiling 30 seconds to 1 minute on each side. Remove carefully with a slotted spatula or spoon, placing a clean folded dish towel under it because the bagels will be slippery. Place each bagel back onto the parchment lined baking sheet and repeat boiling with the remaining bagels.
  • When all bagels have been boiled, bake them in a 425 degree oven for about 25 minutes or until puffy and lightly browned. Move baked bagels to a wire cooling rack to cool.
  • Freeze any bagels you will not eat by the end of the day.
Makes 8 mid-size bagels


Kneaded dough, set to rise


Before boiling

After boiling


Wednesday, March 6, 2019

Almond Flour Chocolate Muffins (Gluten Free)


Almond Flour Chocolate Muffin

Based on my Almond Flour Cinnamon Muffins, these muffins here are chocolatey and satisfying. That's all I have to say right now because I don't feel like going into it. These muffins feed my tummy and my soul.

Almond Flour Chocolate Muffins

Ingredients:
  • 2 cups almond flour (made from blanched almonds)
  • 1/3 cup unsweetened cocoa powder
  • 1/2 cup sugar
  • 1/2 teaspoon salt
  • 2 teaspoons baking powder
  • 1/3 cup buttermilk (preferably room temperature)
  • 1 large egg (preferably room temperature)
  • 2 tablespoons vegetable or canola oil
  • 1 teaspoon vanilla extract
  • 1/3 to 1/2 cup semisweet chocolate chips
Instructions:
  • Preheat oven to 400 degrees Fahrenheit.
  • Place cupcake liners into 11 cups of a muffin pan.
  • In a medium bowl, mix the almond flour, cocoa powder, sugar, salt, and baking powder with a wire whisk.
  • In a small bowl or a measuring cup, mix the buttermilk, egg, oil, and vanilla extract with a fork.
  • Thoroughly combine the wet and dry ingredients, and then mix in the chocolate chips, reserving a few to sprinkle on top, if desired.
  • Evenly divide the batter into the 11 cups (I used a large cookie scoop) and sprinkle with a few chocolate chips, if desired.
  • Bake a 400 degrees for 16-18 minutes, or until a toothpick inserted in the center comes out with only a few crumbs.
  • Remove from oven and allow to cool in the pan for about 5 minutes before carefully transferring to a wire rack to finish cooling.
  • Store uneaten muffins in an airtight container and eat within 3 days or freeze.

Makes 11 muffins


A little crumbly, but still moist, chocolatey, and delicious.


Monday, June 4, 2018

Peanut Butter Granola


Perfect Peanut Butter Granola
Summer break. Every teacher's goal for 9 months of the year. I made it.
Honestly, though, I do love my job, and for perhaps the first time in my working history, I have not counted down impatiently for summer to come. I am blessed to have a job I love AND to get a loooong summer break as well.
Summer, to me, means that I get to cook and blog to my heart's content. Unfortunately, though, my oven is in need of repair, and I must endure another week or so of not having a working oven.
I do have a wonderful sister-in-law, though, who lives just down the street, so I baked up this tasty granola in her oven this afternoon.
If you've ever had Nature Valley Peanut Butter Granola Bars then you know what this granola tastes like. It is crunchy, toasty, and full of peanut butter goodness. It's very easy to make and it's much less expensive than buying ready-made granola. 
Seriously, so easy. You really must try making it on your own.


Peanut Butter Granola

Ingredients:
  • 2 egg whites
  • 1/4 cup corn syrup or honey
  • 1 tablespoon vegetable oil
  • 2/3 cup brown sugar
  • 3/4 cup peanut butter
  • 1/2 teaspoon kosher salt
  • 1 teaspoon vanilla extract
  • 4 cups old fashioned rolled oats
Instructions:
  • Preheat oven to 300 degrees Fahrenheit.
  • Line a large sheet pan with parchment paper.
  • In a medium or large bowl, completely mix the egg whites, corn syrup (or honey), vegetable oil, brown sugar, peanut butter, kosher salt, and vanilla.
  • Stir in the rolled oats until everything is incorporated.
  • Spread mixture evenly over the prepared pan.
  • Bake at 300 degrees for 45 minutes, stirring every 15 minutes. Turn the oven off and leave the granola in there for another 15 minutes. 
  • Then remove from the oven and stir. Allow to cool completely before eating or placing in a gallon sized zip top bag.
  • Try to enjoy it within two weeks for best flavor.

Makes about 5 cups of granola.


Tuesday, May 5, 2015

Macadamia Coconut Granola

Macadamia Coconut Granola
Super Target recently had their nuts and trail mixes on sale, "buy one get one 50% off," so of course I had to stock up on macadamia nuts. I'm out of Dove Milk Chocolate Promises, though, so I had to figure out what to do with some of the nuts. The logical choice was to take my friend Christie's Cranberry Walnut Granola recipe and change it up with some macadamia nuts and coconut. Good call. Very good call. This granola may not be as healthy as the walnut/cranberry version, but it is just as tasty. The only reason I did not add the flax seed meal is that I didn't have any golden flax meal, and I didn't want to ruin the golden tones of this granola with the strange dark brown tone of the regular flax meal. Yeah, it sounds weird to me too as I type it.
This granola is pretty crunchy and flavorful. It's great with milk and it's also great with yogurt (I enjoyed some with AE Dairy Almond Creme Greek Yogurt). I think any way you like to eat granola, you'll like this one.


Macadamia Coconut Granola
    --Adapted from bonappetit.com

Ingredients:
  • 4 tablespoons canola oil
  • 3/4 cup brown sugar (packed)
  • 2 large egg whites
  • 1/4 scant teaspoon kosher salt*
  • 3 cups old fashioned oats
  • 1 cup macadamia nuts, coarsly chopped (I used lightly salted macadamias)
  • 3/4 cup coconut flakes
  • 1/4 cup light corn syrup
Instructions:
Preheat oven to 350 degrees Fahrenheit
Brush a heavy rimmed baking sheet with 2 tablespoons canola oil.
Whisk 2 tablespoons canola oil, sugar, egg whites, and salt in a large bowl. Mix in the oats and macadmias. 
Spread mixture evenly on prepared pan. Bake 15 minutes at 350 degrees. Stir with a metal spatula and then bake 8 more minutes. Stir again. Sprinkle coconut over the top and drizzle with corn syrup. Bake until golden brown, about 7-8 more minutes. Stir to loosen and transfer to a clean baking sheet to cool completely. 
Store in the refrigerator in an airtight container. Serve as it is for a snack, or with milk as a cereal.
Makes about 6 cups

* My macadamia nuts were salted, so I reduced the salt in this recipe to 1/4 teaspoon. If you're using unsalted macadamia nuts, increase kosher salt to a scant 1/2 teaspoon.


Thursday, November 13, 2014

Fried Ice Cream

Fried Ice Cream

After two recent disappointing encounters with fried ice cream at two different local Mexican restaurants, I decided the other day to take matters into my own hands. I've been meaning to do this for some time, and my craving for fried ice cream finally reached a fever pitch. I was compelled to do this, and today I am thankful that I both have the time and resources to do this for fun. 
I wouldn't say I've perfected this dish at all, but what you see above was infinitely more satisfying than the sad excuses I had at the restaurants--those tasted like they'd been fried days before I even got there. At any rate, this fried ice cream here is crisp on the outside, and very cold and vanilla-y on the inside. I used a vanilla bean ice cream, and I kind of think it might have been a mistake. I think I needed to go for a plain old vanilla ice cream to really get the taste I have in my mind of the perfect fried ice cream. I'll just have to try again sometime.
I'm glad I took a few minutes to make the whipped cream to go with this too. For some reason, it balanced the flavors of the coating and the sweetness of the vanilla ice cream. I don't know why exactly, but it completed the dish for me. For my first attempt at frying these yesterday, I made a little chocolate ganache to go on top, but it ended up soaking into the corn flake exterior and just didn't look appetizing. It tasted good, but it was not very attractive for the pics here.
So, there you go. My first (well, second) attempt at frying ice cream. Now when I get a craving for it, I know exactly what I need to do.

Fried Ice Cream

Ingredients:

  • 1 quart vanilla ice cream
  • 2 1/2 cups corn flakes cereal
  • 5 tablespoons sugar
  • 1/2 to 1 teaspoon ground cinnamon
  • 2 eggs, beaten
  • canola oil for frying
  • 2 flour tortillas
  • cinnamon sugar
  • whipped cream

Instructions:
The day before, scoop ice cream into balls, place on a wax-paper lined baking sheet, and freeze 2-6 hours, or until very firm. (Note: I used a large cookie scoop for this. Each scoop measured about 1/4 cup. I ended up with 8 ice cream balls.)
When ice cream balls are firm, start prepping the coating. Place beaten eggs in a shallow bowl/dish. Crush corn flakes cereal until you have smallish pieces, but not pulverized. Mix in the 5 tablespoons sugar and 1/2 to 1 teaspoons cinnamon (depending on your preference for cinnamon). Prepare another baking sheet by lining it with wax paper.
Working with one ice cream ball at a time, roll and press it into the corn flake mixture. Then roll it in the eggs to coat completely. Roll in the corn flake mixture again, making sure to press the coating into the sides to get a nice solid coating. Place coated balls on prepared baking sheet and freeze overnight, until hard--like rock hard. Repeat with remaining ice cream balls.
When coated ice cream balls are hard, leave in the freezer until ready to fry, and get the oil heated and cinnamon crispas made.
Place about 3 inches of canola oil in a medium pot (not any kind of shallow pan--a cooking pot). Heat oil on a burner set to medium-high heat. Prepare a plate by lining it with paper towels (this is for the crispas).
While oil heats, cut the tortillas for the crispas. I cut cute flower shapes today, but you can cut strips, or triangles--whatever works for you. Place a small tortilla scrap in the oil while it heats. When it starts to sizzle and brown, place another small piece in the oil. If it starts to sizzle right away, your oil is ready. Place a few tortillas in there to fry up golden-brown and crispy. Turn when edges are browned, and fry until deep golden brown. Remove to the paper towel lined plate and sprinkle immediately with cinnamon sugar, preferably on both sides. Repeat with remaining crispas.
Once crispas are fried, set them aside and start frying the ice cream, one ball at a time. Leave remaining ice cream balls in the freezer while they wait their turn.
Carefully place a frozen coated ice cream ball into the hot oil and fry for only about 12-15 seconds, turning with a slotted spoon to fry all sides. Remove with a slotted spoon to a paper towel to drain momentarily before putting in a bowl to serve. Top with whipped cream and cinnamon crispa.
Repeat with remaining ice cream balls. 
(Note: I've left most in the freezer and fried a couple a day--the only problem with that is that some of the sugar and corn flakes have stuck to the bottom of the pan and have made ugly black flecks on my fried ice cream. I think my oil was only really okay for two different frying sessions. I'll have to figure this out.)

Makes 8 smallish servings


01 09