Tuesday, December 12, 2023

Candy Cane Hot Cocoa Mix


I've been making hot cocoa from scratch for a few years now because it's really as easy as placing equal amounts of good cocoa powder, sugar, a pinch of salt, and a little hot water in the bottom of a mug, stirring to a paste, adding milk, and microwaving for 1 minute 40 seconds. This way, I know all of the ingredients going into it, and it's inexpensive compared to powdered mixes.

At any rate, last year I realized that if I wanted my favorite peppermint hot cocoa, I could either pay Williams Sonoma a ridiculous amount for their delicious hot chocolate, or I could figure out my own. I tried pulverizing some leftover candy canes and subbing that for the sugar I normally use, and to my actual surprise, it worked great.

So this year, I've decided to make it easier on myself and pre-mix the cocoa powder and candy cane dust. I've also decided to share it with anyone who also wants to enjoy delicious peppermint hot cocoa at home.

You're welcome.


Candy Cane Hot Cocoa Mix

Ingredients:
  • 1 1/2 cups candy cane powder/crumbs (approx. 24 peppermint candy canes)
  • 1/4 cup broken candy cane pieces
  • 1 to 1 1/2 cups dark cocoa powder
  • 1/4 teaspoon salt
Instructions:

Using a food processor or a gallon size freezer bag and a rolling pin, pulverize the candy canes until they are mostly a powder. You should get approximately 1 1/2 cups of candy cane powder/crumbs.

In a medium size bowl, add the candy cane powder, cocoa powder and salt. (If you like your hot cocoa sweeter, use the smaller amount of cocoa powder.) Mix with a whisk.

Store in mason jars or other airtight container(s).

For extra sweetness and mintiness, you can coarsely crush about 4 more candy canes and add to the mix. The basic recipe here is somewhat flexible.

Makes about 1 1/2 cups of mix.

Directions for the actual cocoa below:


Candy Cane Hot Cocoa

Ingredients:
  • 2 tablespoons candy cane hot cocoa mix
  • 1 tablespoon hot water
  • 8 oz milk (whichever kind you prefer)
Instructions:
Put the hot water and cocoa mix into a mug and stir until cocoa is dissolved into the water. You may have some unmelted bits of candy cane left at this point.

Pour milk into the mug, stir, and microwave on high for 1 minute 40 seconds. (Alternately, heat up the milk before adding it to the mug.)

Stir and enjoy, taking care to not burn your mouth.

I used a food processor to crush the candy canes.


Cocoa mix added to the water.

Milk gets added to the paste.

Not my best photography work, but you get the idea...


Thursday, October 19, 2023

Salted Caramel Sauce


Salted Caramel Sauce


This here has to be one of my favorite recent recipes. I started making cold brew coffee recently, and this is what I've been using to sweeten it. And I also eat it by the spoonful on occasion. It tastes like See's Candies Butterscotch Lollipop in liquid form. Just delightful.

If you've never worked with molten sugar before, please be extra careful, and watch the video below to see the process. It's not a difficult recipe, but working with melted sugar is always  somewhat delicate and dangerous. 

I haven't tried it yet, but I'm sure this sauce would taste great on ice cream or the Butterscotch Pots de Creme that I have posted here on the blog. In any case, if you enjoy salted caramel, you'll love this recipe.

Please note that there's a very fine line between flavorful and burnt caramel, so if you're trying this for the first time, err on the side of a lighter-colored caramel. Once you get the feel of it, you can risk going a little darker the next time--because there WILL BE a next time.

Enjoy!

Salted Caramel Sauce

Ingredients:
  • 2/3 cup heavy cream
  • 1/2 cup white sugar
  • 1/4 teaspoon sea salt
Equipment/Tools:
  • clean & warm 1/2 pint mason jar
  • heavy-bottomed saucepan
  • small saucepan
  • wire whisk
  • silicone spatula
  • measuring cups and spoons
Instructions:
  • Place cream in the small saucepan over low heat. Once it's hot, you can turn it off. Keep an eye on it to make sure it doesn't boil.
  • Place the clean mason jar on the stove to stay a little warm while you make the caramel sauce.
  • Pour the sugar into the large saucepan set over medium heat.
  • It will take a while, like 5-8 minutes before you start seeing the sugar start to melt. When you start seeing melted patches, start gently swirling the pan to evenly distribute the sugar and prevent any burned spots. 
  • Continue melting and swirling the sugar until it's a deep amber color. Once it's deep amber, remove from the heat and pour in about half of the cream, which will bubble up violently. 
  • Whisk the sugar and cream together, making sure to get any sugar in the corners of the pan. 
  • Whisk in the remaining cream, and then the salt. Whisk until smooth, again paying attention to the corners of the pan. 
  • Pour the caramel sauce into the mason jar, scraping all the goodness in using a silicone spatula. 
  • Allow the caramel to cool enough to touch the jar without hurting yourself, put the top on the jar (not too tight), and allow to cool completely before placing in the refrigerator.
  • Use in your coffee or enjoy by the spoonful.
Makes about 1 cup of sauce


Ciabatta Rolls

Ciabatta Rolls


So, I started this post about eight years ago, and I cannot recall why I didn't finish it then. I didn't completely finish it today either. I just want to get the recipe posted because I think I'll be making it again. Perhaps there are other bread people out there who might be up for it as well. And perhaps I'll even make these again soon so I can take more pics or even make a TikTok about it. We shall see.
For now, this is what I have. 
There are so many things I love about these rolls, I don't know why I forgot about them. They're light, flavorful, versatile, and such a great sensory experience to make. The dough gets super puffy and jiggly (see video clip at the bottom), and they're delicious.
This week I used one of these for a fantastic breakfast sandwich with Black Forest ham, egg, and American cheese. Mmm. Super satisfying. The rest are waiting in the freezer for my nephews who visit next month, but I think I may try to bake some more because I'll want to eat and share these with Ezra AND I want to add more pics here.
Okay, enough rambling. Back to baking.


Ciabatta Rolls
    --adapted from Cook's Illustrated


Ingredients:

Biga
Dough

Instructions:
1. FOR THE BIGA: Combine flour, yeast, and water in medium bowl and stir with wooden spoon until uniform mass forms, about 1 minute. Cover bowl with plastic wrap and let stand at room temperature (about 70 degrees) overnight (at least 8 hours and up to 24 hours).
2. FOR THE DOUGH: Place biga and dough ingredients in bowl of stand mixer fitted with paddle attachment. Mix on lowest speed until roughly combined and shaggy dough forms, about 1 minute; scrape down sides of bowl as necessary. Continue mixing on medium-low speed until dough becomes uniform mass that collects on paddle and pulls away from sides of bowl, 4 to 6 minutes. Change to dough hook and knead bread on medium speed until smooth and shiny (dough will be very sticky), about 10 minutes. Transfer dough to large bowl and cover tightly with plastic wrap. Let dough rise at room temperature until doubled in volume, about 1 hour.*
3. Spray silicone spatula or bowl scraper with nonstick cooking spray; fold partially risen dough over itself by gently lifting and folding edge of dough toward middle. Turn bowl 90 degrees; fold again. Turn bowl and fold dough six more times (total of eight turns). Cover with plastic wrap and let rise for 30 minutes. Repeat folding, replace plastic wrap, and let rise until doubled in volume, about 30 minutes longer. Meanwhile, adjust oven rack to lower-middle position, place baking stone on rack, and heat oven to 450 degrees at least 30 minutes before baking.
4. Line two rimless baking sheets (or the underside of a baking sheet)** with parchment paper Transfer dough to liberally floured counter, being careful not to deflate completely. Liberally flour top of dough and divide in half. Adjust each piece of dough so cut side is facing up and dust with flour. Cut each half again in half along the length of the dough. Working with one fourth of the dough at a time, cut each strip into thirds (you will end up with 12 rolls in the end). 
With well-floured hands, take each piece of dough and press with your fingertips to stretch dough to a rough 3x5 inch rectangle. Fold rectangle into thirds and gently press the seam on the long side. Roll in a little bit of flour to prevent sticking. Place on parchment lined baking sheet. Repeat with remaining dough until you have six little loaves on each parchment lined baking sheet. Cover loosely with plastic wrap. Let loaves sit at room temperature for 30 minutes (surfaces of loaves will develop small bubbles).
5. After this last rise, place one of the pans in the fridge while you bake the other. Using floured fingertips, evenly poke entire surface of each roll. Spray loaves lightly with water. Carefully slide parchment with loaves onto baking stone using jerking motion. Bake at 450 degrees, spraying loaves with water twice more during first 5 minutes of baking time, until crust is deep golden brown and instant-read thermometer inserted into centers of loaves registers 210 degrees, 14-18 minutes. Transfer to wire rack, discard parchment, and cool loaves to room temperature, about 1 hour, before slicing and serving. Repeat with the other pan that's waiting in the fridge.

Makes 12 large rolls

** I use a baking stone in my oven, and it's always in there. If you do not have a baking stone, just bake the rolls on a parchment lined baking sheet and ignore all of the instructions to slide the rolls onto the bakig stone. Just put the baking sheets in the oven to bake.

*It's kind of tricky to keep track of the steps of dough development, so here's a summary/check list:
  • Prepare biga the night/day before.
  • Mix dough.
  • Let dough rise 60 minutes.
  • Fold dough 8 turns with greased spatula. 
  • Let dough rise 30 minutes. 
  • Fold 8 turns again .
  • Let dough rise 30 minutes.
  • Preheat oven.
  • Form loaves. 
  • Loaves rise 30 minutes. 
  • Poke loaves with fingertips.
  • Spray with water 
  • Bake 14-18 minutes.


Saturday, October 14, 2023

Beef Stew

Beef Stew


I realized the other day that I don't yet have a recipe for beef stew on this site. So weird. Today's stew that you see here is actually an experiment that went well, so now it will become my beef stew post here. 

I basically modified my recipe for Swiss steak by adding stew meat instead of steak, and I added more liquid and carrots. I suppose I could have cubed some potatoes and added them when I added the carrots, but serving the stew over mashed potatoes sounded more cozy and comforting today, so that's what we've got here.

This made so much that I was able to send a bunch home with my son, take some to my in-laws, and have leftovers for my husband and myself as well. I think it would probably freeze pretty well too, but I distributed it well enough that I didn't get the chance to check that assumption. 

At any rate, I think this is a solid, delicious beef stew that I will definitely be making again. 


Beef Stew

Ingredients:
  • 4 pounds beef stew meat (preferably large chunks)
  • 2 (approx) teaspoons kosher salt
  • 1 (approx) teaspoon ground black pepper
  • 2/3 cup flour (I used Better Batter Gluten Free AP Flour)
  • vegetable oil for browning meat
  • 2 large onions, thinly sliced
  • 4 celery stalks, thinly sliced
  • 4 medium garlic cloves, minced
  • 3 teaspoons paprika
  • 2 teaspoon dried oregano
  • 5 cups beef broth (I used 5 teaspoons beef base in 5 cups warm water) 
  • 2-3 cups sliced carrots
  • 2 tablespoons finely chopped curly parsley
  • 1-2 batches of mashed potatoes (here's a garlic mashed potatoes recipe if you need one)
Instructions:

Preheat oven to 325 degrees Fahrenheit.

Prepare the onions, celery and garlic. Set aside.

Place a portion of the meat on a cutting board and sprinkle each with a little kosher salt and pepper.

Then using a meat tenderizing mallet pound each piece to about 1/2 an inch thickness. Be sure to pound on both sides of each piece of meat. If you have some exceptionally large pieces (bigger than 2 inches), you can cut them in half. If you have stew meat that is cut into small pieces, you can skip this step.

Place the flour in a medium bowl and toss each piece of tenderized met in the flour. You can toss several pieces at once, making sure to shake off any excess flour. Do this with all of the meat and set aside until ready to brown the meat.

Heat about 3 tablespoons of oil in a Dutch oven over medium high heat. When oil is hot, carefully place steak into the pan taking care not to crowd. You will need to brown the meat in many batches, adding oil between batches. When each piece of meat is browned on each side, move to a large bowl to wait.

When all meat has been browned, add the onions, celery and garlic to the Dutch oven. Stir veggies and cook just long enough until they start to wilt. Add paprika and oregano and stir. Pour in the beef broth and stir. Add the meat back into the Dutch oven, making sure you cover the meat with the veggies and liquid.

Place cover on Dutch oven and place in the oven. Bake at 325 degrees for about 1 1/2 hours and then stir in the carrots. Bake another hour or so, or until meat is very tender. Stir in the chopped parsley.

Taste for salt level and add more salt, if needed.

Serve over mashed potatoes and sprinkle with a little more parsley, if desired.

Makes about 8 to 12  servings


You can see the mashed potatoes a little better in this pic.

Saturday, September 23, 2023

Mixed Berry Muffins


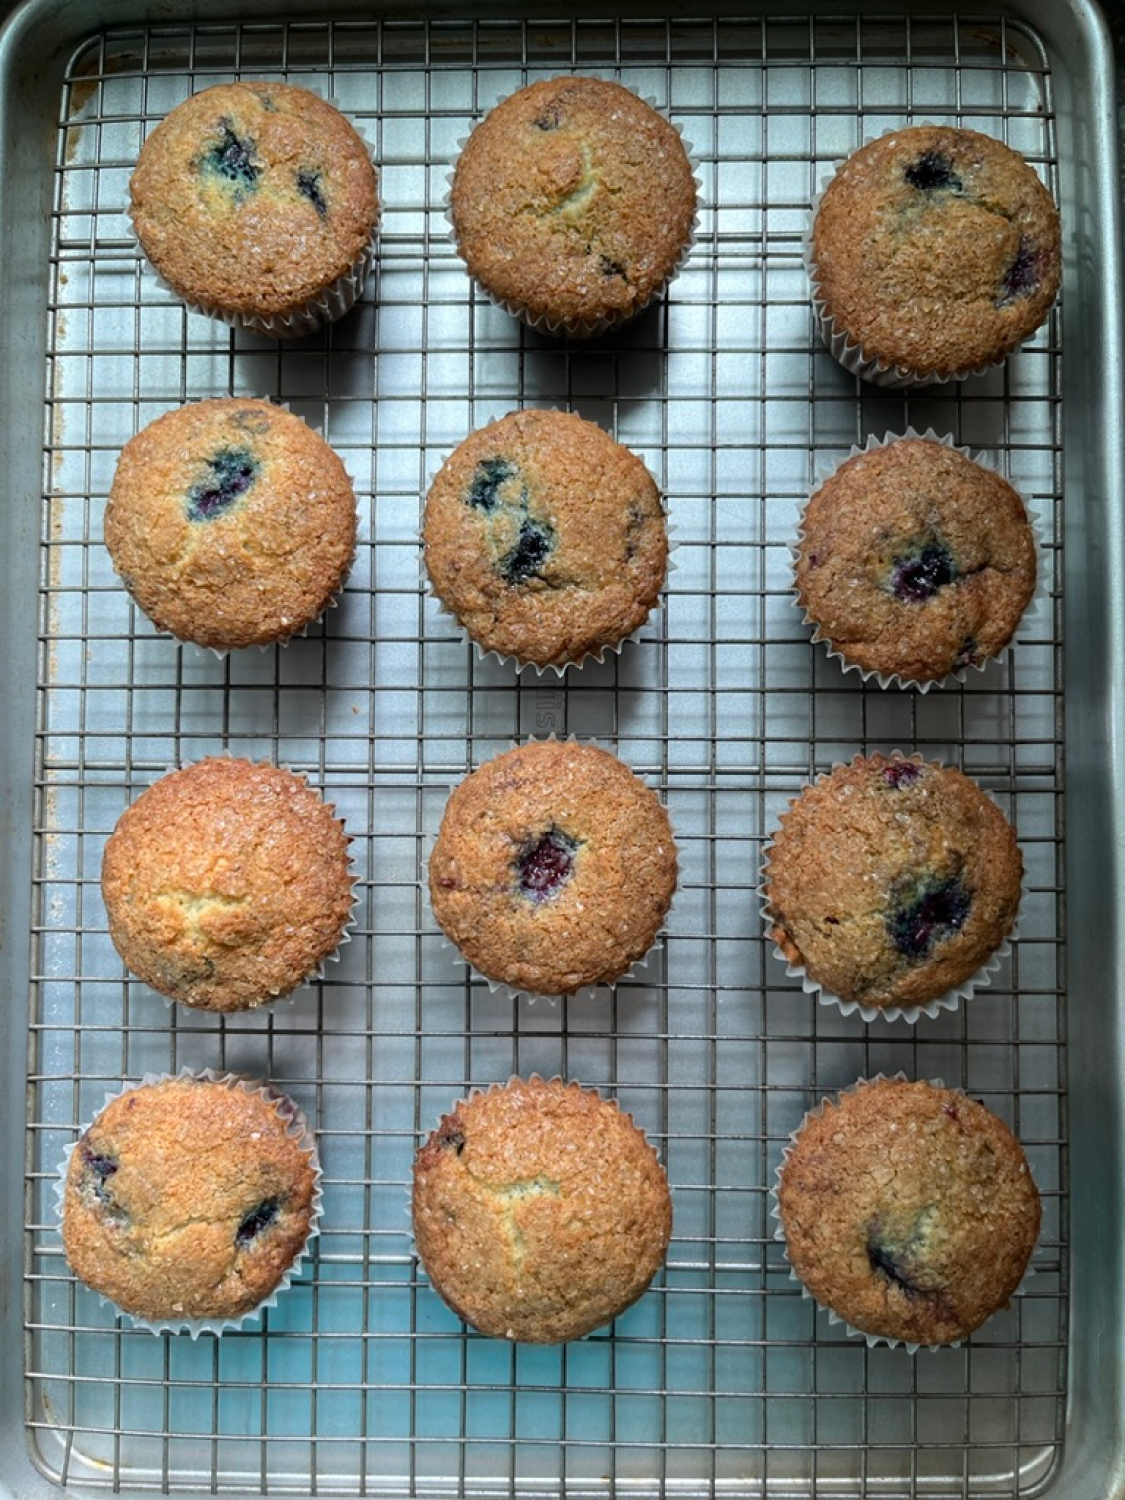
Oh my goodness. Claire Saffitz has done it again: given me a recipe I will cherish forever. Her most recent video was of her and her mom baking blueberry muffins. I only had frozen mixed berries on hand, so that's what I used. These are the kind of muffins that really taste more like cake than muffin, but that's fine with me. I think I like the mixed berries more than I would just blueberries because the raspberries and black berries add just a touch of tartness. These ones are actually my second attempt in two days. 


Mixed Berry Muffins

Adapted from Claire Saffitz x Dessert Person YouTube


Ingredients:

  • 1 stick butter, softened
  • 1/2 cup sugar
  • 1 egg (room temperature)
  • 1 teaspoon lemon zest
  • 1 cup + 1 Tablespoon all-purpose flour
  • 1 tsp baking powder
  • 1/2 teaspoon baking soda 
  • 1/2 teaspoon kosher salt (Diamond Crystal; if using Morton's use 1/4 teaspoon)
  • 1/2 cup sour cream (or plain yogurt)
  • 1/2 teaspoon vanilla
  • 1 cup frozen berries (blueberries, raspberries, black berries, mixed...)
  • 1-2 tablespoons demerara sugar

Instructions:

  • Preheat oven to 375 degrees Fahrenheit.
  • Line a muffin pan with paper liners.
  • Leave the berries in the freezer until they are called for in the recipe.
  • In a small bowl, whisk together the flour, salt, baking soda, and baking powder. Set aside. 
  • In a medium mixing bowl, whisk together the butter and sugar until lighter in color. (You can also use a stand or hand mixer, but today I used a whisk.)
  • Whisk in the egg, and then whisk in the lemon zest.
  • Make a little divot in the sour cream/yogurt and pour in the vanilla.
  • Using a silicone spatula, stir a third of the dry ingredient mixture into the butter/sugar/egg mixture.
  • Then stir in half of the sour cream/yogurt/vanilla.
  • Stir in another third of the dry ingredients.
  • Stir in the remaining sour cream/yogurt/vanilla.
  • Then stir in the remaining dry ingredients.
  • Gently fold in the frozen berries. You'll notice the batter gets thicker because the berries are bringing the temperature down.
  • Evenly divide the batter into the 12 muffin cups (I used a large-ish cookie scoop).
  • Sprinkle the tops of the muffins with the demerara sugar.
  • Place pan in the preheated oven and bake at 375 degrees for 20-24 minutes, or until golden brown on top (mine baked a little too long today).
  • Remove pan from oven and then carefully remove the muffins from the pan to finish cooling on a wire rack. 

Makes 12 muffins


I used a whisk today instead of my stand mixer and it worked great.
This is just the butter and sugar at this point.

Make sure the berries are really frozen when you stir them into the batter.


Sunday, September 10, 2023

Levain Inspired Chocolate Chip Cookies

Levain Inspired Chocolate Chip Cookies

Being a big fan of cooking shows and YouTube in general, I'd seen the Levain cookies reviewed several times, and everyone seemed to conclude that they are the BEST chocolate chip cookie of New York, if not the world. 

Since I had no immediate plans to visit NY, I never really thought I'd get a chance to try the actual cookie. We did take a trip to Washington DC this past summer, though, and Georgetown had a Levain bakery. I told my husband that Levain was my number 2 tourist priority after the obvious touring of most of the Smithsonian and the National Mall.

I'll cut to the chase: the Levain Cookie, although large, gooey, and beautifully colored, didn't live up to my expectations. I mean, how could it? I probably broke into it too soon because it was fresh out of the oven (I had to wait a bit for my order to bake), but still, the one thing I noticed was a lack of flavor. Yeah. Flavor. My husband surreptitiously took a video of my comments, and I declared after tasting, "It needs salt." Actually I thought it needed vanilla too. I brought some cookies home for my foodie son to try, and his first comment upon tasting the chocolate chip walnut cookie was, "Needs salt." Maybe we just like salt around here.

This recipe here is adapted from Cupcake Jemma's version. I've added vanilla to the recipe and increased the salt and baking soda. I cut the size of the cookie in half because 1. I don't like uncooked dough in the center and 2. I'm not selling these at a bakery. As it is, the 60 gram cookie is like eating 2 normal sized chocolate chip cookies. 

I cut back the size even further in later iterations because I wanted to try it and because I'm taking them to an event.

So why do I like THESE cookies enough to keep making them and commit them to this blog? First of all, they taste great. Maybe not my favorite CCC recipe, but very tasty. They're soft, thick, and baked all the way through. They kind of crumble a little like an American buttermilk biscuit, so when I eat one I break off a bite at a time, and I usually heat it up in the microwave for about 11 seconds too. Second of all, unlike lots of other CCC recipes, these still taste great even 2-3 days after baking. I usually won't eat a CCC after day 2, but these are the exception. Overall, a crowd-pleasing cookie.

I've written much more than I intended here, so without further ado, here's the recipe:


Levain Inspired Chocolate Chip Cookies (NOT a copycat recipe)

Adapted from Cupcake Jemma's Recipe on Youtube

Ingredients:
  • 230 g unsalted butter, cold, cut into tablespoon size chunks
  • 160 g granulated sugar
  • 160 g brown sugar
  • 450 g chocolate chips (I used Nestle semi-sweet morsels)
  • 200 g walnut pieces (optional)
  • 230 g self-rising flour*
  • 200 g all purpose flour
  • 2 teaspoons baking powder
  • 1 teaspoon salt
  • 1 teaspoon baking soda
  • 2 large eggs, beaten
  • 2 teaspoons vanilla extract
Instructions:
  • (Scroll to the photos at the end to see what this unconventional process looks like.)
  • In the bowl of a stand mixer, place the cold butter and mix on low for about a minute, just to break up the butter--do not cream the butter.
  • Add the granulated and brown sugar to the butter and mix again on low/medium low until little nuggets of butter & sugar form--again, do not cream this mixture.
  • Add the chocolate chips and walnuts (if desired), and mix again just to incorporate the chocolate chips and nuts.
  • In a separate bowl, combine the flours, baking soda, baking powder, and salt. Stir with a whisk until completely mixed. 
  • Add the dry ingredients to the butter/sugar/chocolate/nuts mixture in the mixing bowl and mix on low until combined, about 30-45 seconds. It will still be dry and sandy looking.
  • Add the vanilla to the egg mixture and then add that to the mixture. Mix on low/medium low until dough starts to come together, but do not mix long enough to create a completely cohesive dough.
  • Using a large cookie scoop or a large spoon, make 60 gram gently formed balls of dough -- it's best if you don't pack the dough into a tight ball. Then flatten each ball into a disk that's about an inch thick.
  • Cover and freeze dough disks at least 90 minutes before baking.Preheat oven to 360 degrees Fahrenheit. Line a baking sheet with parchment paper and place in the oven to get hot while the oven preheats.
  • When pan and oven are heated, remove the pan from the oven, place frozen dough disks on pan allowing a couple of inches between them.
  • Bake at 360 degrees for about 14-15 minutes, until puffed and starting to crack. Take care to not over-bake. Underbaked is better than over-baked.
  • Remove from oven and allow to cool on cookie sheet at least five minutes before moving to a wire rack to cool completely. Alternately, if you have a rimless baking sheet, you can slide the parchment with the baked cookie sheets onto a cooling rack to cool until ready to eat, about 5-10 minutes. This is what I try to do so the cookies will not continue to bake on the hot baking sheet.
  • Place unbaked dough disks in a zip top freezer bag and store in the freezer until you want more cookies. 
  • Store baked and cooled cookies in an airtight container.
  • Heat cooled cookies in the microwave on high for 10 seconds if you want to melt the chocolate and make the insides gooey again.
Makes about 30 cookies

*You can mix your own self-rising flour by combining 2 cups all purpose flour with 3 teaspoons baking powder and 1/2 teaspoon salt. Then use just 230 grams of that for this recipe. Save or toss what's leftover...OR use the following measurements if you don't want to bother with mixing the self-rising flour:
  • 230 g unsalted butter, cold, cut into tablespoon size chunks
  • 160 g granulated sugar
  • 160 g brown sugar
  • 450 g chocolate chips 
  • 200 g walnut pieces (optional)
  • 430 g all purpose flour
  • 1 teaspoon baking soda
  • 4 teaspoons baking powder
  • 1 1/2 teaspoons salt
  • 2 large eggs, beaten
  • 2 teaspoons vanilla extract

Make sure the butter is COLD.

Just break up the butter -- don't cream it.


You'll still have chunks of butter after mixing in the sugars.

Yeah, the chips go in before the flour, and the egg goes in at the end.


Everything but the egg and vanilla here.


The dough is never a cohesive mass.

I actually do use a kitchen scale for this.


Frozen dough balls going into the oven now.

Baked.

These ones have nuts. The dough mixed above didn't have them.

01 09