Saturday, August 2, 2025

Quiche with Bacon, Swiss, and Spinach


Simple quiche with bacon, Swiss, and spinach


I have another recipe for quiche on this blog, and it's the general quiche recipe I use. The thing is, though, that I think that time I made it for the blog was the ONLY time I ever used a premade pie crust -- and I didn't even like it because premade crusts tend to have added sugar, which to me is no bueno for a savory dish. 

So, whenever I make quiche, I have to look up my other recipe for pie crust that I actually like, and for this recipe I often have to increase the recipe for a crust and a half because my pie crust recipe is really for a Marie Callendar's size pie, which is smaller than my Made In pie dish. This recipe you have here is what I've actually been doing, and this will be the recipe I go to every time I make quiche from now on. (You know that's the main reason I have this blog at all--it's my recipe box.)

Quiche
      -adapted from Sally's Baking Addiction

Ingredients:

  • 1 blind-baked 9" pie crust (see pie crust recipe below) 
  • 1 tablespoon butter
  • 1/4 cup finely chopped shallot
  • 1 small garlic clove, finely chopped
  • 5 ounces of fresh baby spinach, roughly chopped
  • 1/2 teaspoon salt
  • 1/4 teaspoon ground black pepper
  • 5 large eggs, room temperature
  • 1 1/4 cup whole milk, preferably room temperature (today I used 1/2 cup heavy cream and 3/4 cup 2% Fairlife milk)
  • 1 1/4 cup shredded Swiss cheese
  • 1 cup (about 7 strips) thick cut bacon, cooked, and cut into bite-size pieces

Instructions:

  • Preheat oven to 375 degrees Fahrenheit.
  • In a small saucepan over medium heat, melt the butter, and then add the shallots. Cook until shallots are soft, but not necessarily browned. Add the garlic and cook for another minute. Add the chopped spinach and stir into the shallot/garlic mixture until spinach is completely wilted. Remove to a plate to cool.
  • In a medium bowl or large glass measuring cup (the 1 or 2 quart size), beat the eggs with the milk (or milk and cream in my case). Whisk in the salt and pepper. Then add the cooled spinach mixture and stir/whisk to incorporate. (Note: If spinach mixture is not totally cooled, add a tablespoon of the hot mixture at first to the egg/milk mixture and whisk. Keep adding a little bit at a time. Once you have half of it mixed in, add the rest and finish mixing. This prevents the eggs from cooking before it goes into the oven.)
  • Layer the bacon and then the cheese into the pie crust. Pour the egg mixture evenly over the ingredients in the pie crust. (You may need to do a little light mixing once it's in the dish because the shallots tend to sink to the bottom of the egg/milk/spinach mixture.)
  • Place unbaked quiche on a foil-lined or parchment-lined baking sheet and bake at 375 for about 45 minutes, or until center no longer jiggles like a liquid when the pan is gently shaken.
  • Remove quiche from oven and allow to cool about 20 minutes before serving.
  • Refrigerate any leftovers.

Makes about 6-8 decent sized servings

Pie Crust

Ingredients:

  • 1 1/2 cups plus 2 tablespoons Unbleached All-Purpose Flour
  • 3/4 teaspoons salt
  • 6 tablespoons butter, cut into 1/4 inch slices
  • 4 1/2 tablespoons Crisco vegetable shortening
  • 5-6 tablespoons ice cold water
  • flour for dusting
Instructions:
  • In a medium bowl, mix flour and salt. 
  • Cut the 6 tablespoons of butter into flour until it looks like coarse meal with a few small pebbles of butter.
  • Add the Crisco and cut in until you have a coarse meal with a few small pebbles of Crisco.
  • Add 5 tablespoons of the ice cold water and stir with fork. Then use your hands to gently work the dough into a ball, adding a little more water and stirring with the fork if it still seems super dry. Do not add more than 6 tablespoons of water. The warmth of your hands will help bring the dough together.
  • Place larger-than-square piece of wax paper on the counter and sprinkle with some flour. 
  • Place the dough on the wax paper and flatten into a disk that's about 1 1/2 inches thick, pressing in the edges as needed if they start to crack.
  • Sprinkle the top of the dough disk with more flour, cover with another sheet of wax paper, and roll out to about 3/8-inch thickness, or large enough to fit in and up the sides of the 9" pie dish.
  • Transfer the dough to the 9" pie dish, trim, tuck, and decorate the edges however you like.
  • Cover the unbaked pie crust and place in the refrigerator to chill for at least half an hour. 
  • Preheat your oven to 400 degrees Fahrenheit while the crust chills.
  • When you're ready to blind bake the crust, remove from the fridge, uncover, and prick all over with a fork.
  • Blind bake it however you'd like, but this is what I do:
  • Crinkle up a thin piece of foil, uncrinkle it, and gently press it into the unbaked pie crust. The foil should go completely up the sides of the crust and it may even cover the edge, but it does not have to. Fill the foil-lined crust with dry beans, dry uncooked rice, or pie weights.
  • Bake at 400 degrees for about 15 minutes. 
  • Remove from the oven, set aside, and allow to cool for a bit while you prepare the filling.
  • Turn oven down to 375 degrees for baking the quiche.


Tuesday, July 29, 2025

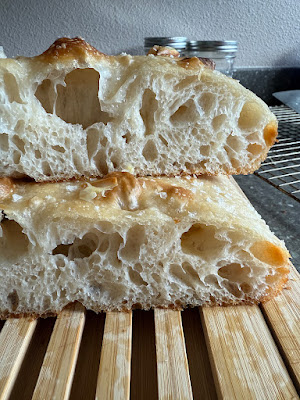
Sourdough Focaccia


Sourdough Focaccia


I found this recipe on Reddit and am putting it here because I want to keep it. This focaccia is chewy, fluffy, and absolutely delicious. If you're a baker of sourdough, you really must try this one. It does not disappoint.

Sourdough Focaccia

Ingredients: 
  • 50-100 grams ripe sourdough starter
  • 10 grams salt
  • 430 grams water
  • 515 grams bread flour
  • olive oil
  • flaky or coarse salt
  • 2 large garlic cloves
Instructions:
  • In a large mixing bowl, whisk together the sourdough starter and water. 
  • Add the flour and salt and mix to completely combine the ingredients. 
  • Cover the bowl and allow to sit for 30-40 minutes. 
  • When the dough is done sitting, wet your hands and pull the dough up over on itself around the edges and then perform 8-10 folds. (See video clip below.) End your folding with the smooth side of the dough on top. Drizzle with about a tablespoon of olive oil and rub the oil over the entire surface. Cover and allow dough to rise for 4-5 hours at room temperature, or until almost doubled.
  • When dough has risen, pour 2-3 tablespoons of olive oil into the bottom of a 9x13-inch pan and coat the sides and bottom using your fingers or a pastry brush. 
  • With oiled hands, lift the dough from the bowl. Do a little lifting and folding to form the dough into a rectangle and fit it into the pan as much as possible. 
  • At this point you can allow the dough to rise another 4-6 hours at room temperature, or you can cover and place in the fridge overnight. If you choose the fridge option, remove the pan from the fridge about 2 to 2 1/2 hours before you want to bake it. 
  • Preheat the oven to 425 degrees Fahrenheit. 
  • When dough is puffy, bubbly, and doubled in size, drizzle with a couple more tablespoons of oil and then dimple the dough deeply with oiled fingers. 
  • Slice the garlic cloves into 1/8-inch slices and push slices into the dimples in the dough. Then sprinkle dough with the flaky/coarse salt.
  • Bake the focaccia on a middle rack for 20 minutes. Then move the pan to the lower rack for the last 5-10 minutes of baking. (My focaccia didn't get very dark on top, but it was completely baked through and still tasted great.)
  • Allow focaccia to cool in the pan for about 5-10 minutes. Then use a metal spatula to release the bread from the pan. Move focaccia to a wire rack to cool completely before cutting and enjoying.
Makes one 9x13-inch focaccia


Wednesday, July 9, 2025

Salt & Pepper Potato Chip Seasoning

Homemade Salt & Pepper Potato Chips

I'm a big fan of most salt & pepper potato chips. My favorites are the Lay's Kettle Cooked Chips or Kettle Brand. I was hankering for some salt & pepper chips, but we only had the plain wavy HyVee potato chips on hand, so I decided to experiment and came up with this recipe. I think it works, and I've been enjoying way too many yummy chips ever since. 

Most people have the ingredients on hand, so I think it's worth a try to see if you like these. If you're a fan of salt & pepper potato chips, I think you'll be pleased.


Ingredients:
  • 2 tablespoons onion powder
  • 1 tablespoon garlic powder
  • 1 tablespoon fresh ground black pepper
  • 1/4 to 1/2 teaspoon cayenne pepper
  • plain salted potato chips of your choosing
Instructions:

Mix all ingredients in a small lidded container.

Either keep the chips in their bag or just do a handful in a quart size zip top bag. Add 2 to 2 1/2 teaspoons of the mix for a quart size bag, and use about 2 tablespoons of the mixture for an 8 oz. bag of potato chips. Seal the bag and gently shake to distribute seasoning. Add more seasoning and shake, if desired.

You can enjoy the chips immediately, but I think they taste better after sitting (sealed) for a day or so.

Store leftover seasoning in an airtight container. Scale the recipe up or down as desired.


Use whatever brand and style of plain salted chips you like. 
This local brand happens to be my fav.

Before shaking


Thursday, July 3, 2025

Sloppy Joe Filling


My husband is a big fan of sloppy joes. I, on the other hand, am not. It's not that they taste bad, per se, but they just don't taste good to me. I used to keep a can of Manwich sauce in the cupboard for an easy dinner that made the husband happy, but one day I decided to just look up a recipe and try it from scratch. 

What do you know--it's really simple and actually tastes better than what you get in the can. Still not something I would choose to cook just for me, but I'm counting it as a win. 

There are lots of recipes out there. I have tried a few, and am finally committing this one to the blog because I keep losing the papers I print the recipes out on. I realize there are apps that will keep track of recipes, but I don't want to go and start a whole new thing. I've got pretty much all the recipes I want right here on this blog.

So here you go. Basic sloppy Joe recipe. Enjoy.

Sloppy Joe Filling

Adapted from Allrecipes.com

Ingredients:
  • 1 1/2 pounds lean ground beef
  • 1/2 cup chopped onion
  • 1/2 cup chopped green bell pepper
  • 1 cup ketchup
  • 1 1/2 tablespoons brown sugar
  • 1 teaspoon yellow mustard
  • 1 1/2 teaspoons garlic chili paste (optional)
  • 3/4 teaspoon garlic powder
  • 1/4 to 1/2 teaspoon ground black pepper
Instructions:

In a large pan set over medium high heat, brown the ground beef.

Add the onion and bell pepper and cook until veggies are soft.

Add ketchup, mustard, garlic chili paste, garlic powder, and black pepper. Stir to combine.

Reduce heat to low and simmer for another 15-20 minutes, stirring occasionally. Add a little more ketchup or water if it seems to be getting too dry.

Serve on sliced buns.

Store leftover filling in an airtight container in the refrigerator and consume or freeze within 3 days.

Makes about 8-10 servings


Sunday, May 4, 2025

Cilantro Lime Chicken


Cilantro Lime Chicken served with rice and asparagus


I got this recipe off Sally's Baking Addiction ages ago, and it's truly one of my favorites--even if I haven't made it in a while. It's a little creamy, a little spicy, perfectly savory, and so good served with rice and asparagus. And it tastes great the next day as well. 

It's surprising how quickly this dish comes together, so it's a delicious and satisfying weeknight meal that I need to remember to put into my rotation. 

The only reason I'm putting it here on the blog now is because 1. I am tired of having other search it up I my Pinterest account each time I make it and 2. I'm afraid it will go missing on the internet and then I'd have to make the recipe up myself.

At any rate, it's a great meal. You should try it.

Cilantro Lime Chicken 
     Adapted from Sally's Baking Addiction 

Ingredients:
  • 2 large chicken breasts
  • 1/4 teaspoon salt 
  • 1/4 teaspoon pepper
  • 1 tablespoon olive oil
  • 2 cups chicken broth
  • juice of 1 lime
  • 3/4 cup red onion, chopped
  • 1/4 cup fresh cilantro, chopped
  • 1/2-3/4 teaspoon red pepper flakes
  • 5 tablespoons butter
  • 1/3 cup heavy cream
  • more cilantro for garnish, if desired
Instructions:

Preheat oven to 375 degrees Fahrenheit.

Cut the chicken into about 1/2-inch filets. I cut a filet off the thicker end of the breast, and then I cut the larger bottom piece in two. The original recipe called for pounding the chicken, so that is also an option.

Sprinkle both sides of the cut chicken with a bit of salt and pepper.

Heat an oven-proof frying/sauté pan over medium high heat. Add the olive oil and tilt the pan to evenly coat the bottom with oil.

Add the chicken and sauté until the bottom is nice and golden brown. Turn and brown the other sides. Once both sides are browned, remove chicken to a dish/plate and cover with foil until the sauce is ready.

Add the chicken broth, lime juice, onion, cilantro, & red pepper flakes to the hot pan. Allow liquid to simmer until it's reduced by about half or a little more. Turn off the heat.

Add the butter, and. heavy cream and stir until butter is melted completely. Then add back the chicken, turning to coat.

Place the pan into the oven and cook for about 10-15 minutes uncovered at 375 degrees Fahrenheit.

Remove from oven and serve with rice and vegetable of your choice.


Saturday, May 3, 2025

Liege Waffles

Liege Waffles


Liege Waffles: a buttery yeasted dough studded with Belgian pearl sugar and baked on a waffle iron. I've been wanting to taste these and make them for years. I finally tasted them maybe two years  ago(?) at waffle truck at a bar in Marietta, GA, on St. Patrick's Day. Then a trivia teammate shared with me ones she had made. That was the clincher. I had to make them--and here they finally are, in all their glory. The waffle dough isn't sweet at all, but the sugar pearls add just the right sweetness and crunch on the outside. 

Be sure to read the cleaning note at the end. These make a mess of your waffle iron. 

Shoutout to the blog Whipped for sharing the recipe.

Liege Waffles
Adapted from Whipped

Ingredients:
  • 2 cups all-purpose flour
  • 1 1/2 tablespoons white sugar
  • 1/8 teaspoon salt
  • 2 1/4 teaspoons instant yeast
  • 1/3 cup warm water
  • 3 eggs, room temperature
  • 1 cup butter, melted and cooled
  • 1 1/2 teaspoons vanilla extract
  • 1 cup Belgian pearl sugar
Instructions:
  • To the bowl of a stand mixer fitted with a paddle attachment, add the flour, sugar, salt, and yeast. Then stir ingredients with whisk to blend completely.
  • Add the water and mix on low. 
  • Add eggs, one at a time until they are all completely incorporated. Then mix in vanilla.
  • Slowly add the melted & cooled butter, scraping the sides of the bowl occasionally to make sure it's evenly mixed.
  • Tidy up the dough by scraping the sides with a silicone/rubber spatula.
  • Cover with a tea towel, plastic wrap, or a clean plastic grocery bag, and allow to sit and rise for about 1 hour.
  • Once dough has doubled, add the pearl sugar and fold it in gently, making sure to evenly distribute the pearls.
  • Allow dough to sit again for about 15 minutes. 
  • After dough has sat for 7-10 minutes, plug in your waffle iron (a Belgian style waffle iron is best for this because you get the thick waffles).
  • When the dough and waffle iron are ready, scoop 1/4 to 1/3 cup blobs of dough onto the hot waffle iron. Close and allow to cook until medium golden brown, or browned to your liking. My waffle iron has number settings, and I set mine to 3.5 out of 5. It beeps when they're perfectly browned. 
  • Use tongs or two forks to carefully move the cooked waffles to a cooling rack to cool. The sugar pearls have melted and you don't want to burn your fingers on the molten sugar.
  • Allow waffles to cool about 5 minutes before enjoying. Repeat waffle cooking until all dough is cooked.
  • Store uneaten cooled waffles in an airtight container in the fridge. You can also freeze these. Reheat by toasting on a light setting. 

Makes about 19 smaller waffles or 9-10 medium sized waffles

Re: Cleaning the waffle iron


While the waffle iron was still hot, I unplugged it and then I poured in water to cover the melted sugar and go up the sides about halfway.


After a few minutes I started using a paper towel held by my pair of mini-tongs to wipe it. I then used the same paper towel to soak up the water. I had to wring out the paper towel several times, but it was sturdier than I thought.


The waffle iron has never looked cleaner.


01 09