Saturday, May 19, 2012

Cheese Crackers ala Marilyn


Mmmm...cheese crackers

Over my few months of "membership" on Pinterest, I've noticed several recipes for home made cheese crackers.  Those actually do look to me like crackers.  You know, flat, crisp, salty.  These things you see here can only be loosely called "crackers," but it's what my mom has always called them, and so that's what I'm calling them here.  This is another one of those recipes from the kitchen of my mom Marilyn, that she made a lot when I was growing up.  I don't think there's ever been a written recipe, and it's another recipe whose history I have to ask her about.
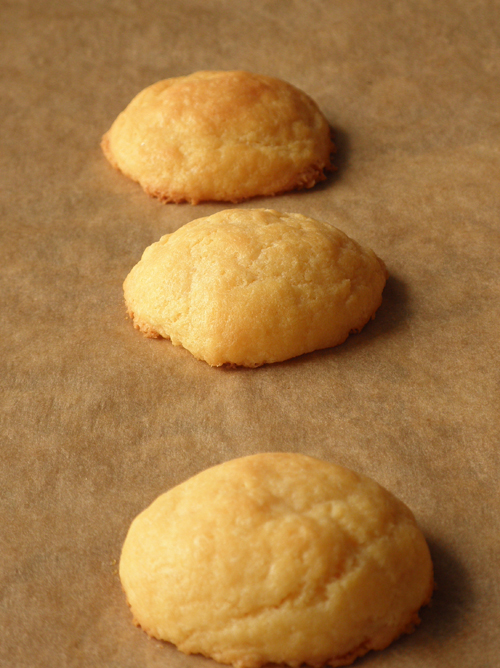
These puffy, cheesy little snacks are so unique.  They're very cheesy, quite salty, and eaten warm, they are crisp on the edges and soft and chewy in the middle.  Oh, SO good.  My mom introduced them to the grandkids when they were little enough not to question, "What's in it?" and all of the kids who can eat wheat LOVE them (sorry, Owen).  My 9 year old son, Ezra, actually said today, "Mom, I think these are the best thing you've ever baked!"  Brownies held that title a couple of days ago, so we'll see how long the cheese crackers hold onto it.
If you like cheese and salt, and generally delicious home baked snacks, this is right up your alley.

Cheese Crackers ala Marilyn

Ingredients:
Instructions:
Preheat oven to 400 degrees Fahrenheit.
Line a baking sheet with parchment paper or nonstick foil. (I think they can also be baked on an ungreased cookie sheet, but it's been a long time since I've done it that way.)
In a medium bowl, thoroughly mix the cheese spread, softened butter, and salt with a spoon.
Stir in flour until incorporated.
Scoop about 1 1/2 teaspoons of the dough and roll it into a ball.  Place balls 2 inches apart on prepared baking sheet.
Bake at 400 degrees for 11-12 minutes, or until edges are browned and cheese crackers are puffed and starting to brown on top.  Remove to a plate and allow to cool for a couple of minutes before attempting to eat.
Makes about 18 cheese crackers, depending on how big you make them.

Unbaked cheese cracker dough balls
Kraft Old English Cheese Spread

White & Wild Rice Pilaf


White and Wild Rice Pilaf 

I wanted something besides potatoes to go with a pork tenderloin I was grilling the other night.  While at the grocery store, I picked up a box of Rice-A-Roni wild rice, and checked out the sodium content.  As expected, it was ridiculously high, somewhere in the 40% of my RDA for sodium range.  The recipe below probably isn't THAT much better, but at least I knew I could control it.  I made it almost as stated on Allrecipes.com, but instead of the vegetable broth called for I used chicken base and water; plus, I did not have celery, so I used celery salt (yes, more salt).  Actually, as far as the salt goes, I look at this as the baseline.  Next time I will add less chicken base, or use celery seed or actual celery, instead of celery salt.  
In any case, this is a great rice dish: flavorful, fresh, and with great texture from the wild rice.  It will be placed into my side dish rotation.  


  • 1 tablespoon olive oil
  • 1 large onion, chopped
  • 2 large carrots, chopped
  • 2 cloves garlic, minced
  • 1/2 teaspoon celery salt
  • 3 1/2 cups water
  • 3 teaspoons chicken base (or 3 chicken bouillon cubes)
  • 1/2 cup uncooked wild rice
  • 1 cup uncooked regular long-grain white rice

Instructions:
Heat olive oil in a medium size heavy saucepan over medium heat.  Add onion, carrots, garlic, and celery salt and cook until vegetables are tender.  Stir in water, chicken base and wild rice.  Heat to a boil; reduce heat, cover and cook over low heat for 25 minutes.
Stir in white rice.  Cover and cook over low heat for another 20 minutes, or until liquid is absorbed and rice is cooked.
Makes 8 servings 


Sunday, May 13, 2012

Scalloped Potatoes and Ham

Scalloped Potatoes and Ham

I've had this blog for almost two years, and I can't believe I have not yet posted my very favorite dish of all time.  This is a dish that I choose to have on my birthday or Mothers' Day even when I have the option of going out to eat at a restaurant.  Since being married, I haven't made it that often, because my husband is not a fan of "casseroles."  He'll eat this, but it's not his favorite.  The reason I haven't made it in the last 6 months or so is that I was diagnosed with high blood pressure, and this is a very salty dish.  The saltiness is probably one of the main reasons that it's my favorite, I'm sure.
This is another of my mother Marilyn's recipes.  She probably got it from her mom, but I just know it as being my mom's.  It is my ultimate comfort food.  It's hot, potatoey, creamy, salty, meaty, and the top and edges that gets browned and caramelized just add another layer of flavor and texture that satisfies my soul.    It's probably better to have this on a cold winter's night, but it will be just as delicious on this warm Mothers' Day.  Plus, I'll be able to take pictures in natural light today, which I cannot do at dinnertime in the dead of winter.  Happy Mothers' Day to me.

Scalloped Potatoes and Ham

Ingredients:
  • 7 medium russet potatoes
  • 4 tablespoons butter
  • 1 (10.5 oz.) can cream of chicken soup
  • 1 1/2 cans of 2% milk* (use the soup can)
  • 1/8 to 1/4 teaspoon ground pepper
  • 1/4 to 1/2 teaspoon salt
  • 1 pound ham steak
Instructions:
Preheat oven to 350 degrees Fahrenheit.
Peel, rinse, and slice potatoes into 1/6-inch slices.
Trim and cut the ham steak into 1 1/2 to 2 inch chunks.
In a medium bowl, whisk together the cream of chicken soup, milk, pepper, and salt. (Note, you CAN use milk with a lower fat content, but the final product will not be as thick and creamy.)
Butter the bottom and sides of a casserole dish with about 1 tablespoon of the butter.
Layer half of the potatoes on the bottom of the buttered dish, making sure to cover up any blank spots.  Layer on the ham.  Layer on the remaining potatoes.  At this point, if you find that you can still see the ham, you might want to peel and slice another medium potato to cover ham completely with potatoes.
Slice the remaining 3 tablespoons butter and spread over the top of the potatoes.
Pour the soup and milk mixture all over the top of the potatoes.  Jiggle dish slightly to evenly distribute the liquid into all the nooks and crannies.
Bake uncovered at 350 degrees for about 2 hours, or until top is browned and liquid is thick and bubbly.
Serves 6


Saturday, May 12, 2012

Fried Pork Tenderloin Sandwich

Fried Pork Tenderloin Sandwich
with friends Watermelon and  French Fries.
Here is a recipe for a classic Midwestern favorite: pork tenderloin.  Most Iowans love all things pork, which is really at the heart of why I started this blog. (See Pulled Pork Cinnamon Roll recipe.)  I'd never had a fried pork tenderloin sandwich until I moved here to Iowa.  And I don't even think I ate one until I made it following this recipe.  I have only eaten a few others, and I think this is still my favorite.  Probably because it's fresh.  The meat here turns out moist on the inside, crisp on the outside, and just plain tasty.  I also love this recipe because it is so simple: pound out the meat, dip in bouillon, dip in crackers, and fry.  One pork tenderloin makes enough to serve five or six people.  I always have leftovers, which do get eaten.

Fried Pork Tenderloin Sandwich
   --adapted from Food.com

Ingredients:


  • 1 pork tenderloin
  • 1 sleeve (or slightly less) saltine crackers, well crushed
  • 1 cup hot water
  • 1 tablespoon chicken base (or three chicken bouillon cubes)
  • canola oil for frying
  • hamburger buns
  • condiments of your choice (I like a little mayonnaise)

Instructions:
Mix the hot water and chicken base/bouillon in a medium bowl or square baking dish.
Cut the pork tenderloin into 1-inch slices.
Place one piece of pork at a time between two medium pieces of plastic wrap and pound with a meat tenderizing mallet until it is about 1/4 inch thick.
Place cracker crumbs into another flat dish or pan, like a pie plate.
Heat about 1 1/2 inches of canola oil in a frying pan over medium high heat (heat to 375 degrees Fahrenheit).
Dip each piece of meat in chicken broth mixture and then lay it down in the cracker meal, coating both sides well.
Carefully place into hot oil.  If you have a wide pan, you can fit 2-3 pieces of pork at a time into the pan.  Turn after about 2 minutes.  Fry until golden brown.
Move to a cooling rack lined with a single layer of paper towels.
Repeat with remaining pork.
Serve on hamburger buns with your choice of condiments.
Makes about 7 or 8 sandwiches.

This is a full pork tenderloin all fried up.


Marilyn's Hershey Bar Pie--Bite Size

Hershey Bar Pie--Bite Size
Right now my house smells like butter and coconut.  That's because I just fried some coconut in butter to top my little Hershey Bar Pie Bites.  I intended to just make a regular Hershey Bar Pie today, but SuperTarget does not carry Oreo Cookie Crusts, and it is too warm of a day to stop at one more store on the way home.  So, another bite-size pie it is!
My mom, Marilyn, made this super simple pie a lot to take to pot lucks and church dinners when I was growing up.  I've never been much of a coconut fan, but when I smelled it sauteing in butter, I knew I had to eat it.
The "filling" for this pie turns out different every time I make it.  I was going to write this big long paragraph about having the Cool Whip and melted chocolate at correct temperatures, but that was before I made this batch.  It still came out a little lumpy.  Suffice it to say, just make sure the Cool Whip is thawed and that the chocolate is NOT hot.  No matter what you do really, once you top it with the "toasted" (aka fried) coconut, it doesn't really matter so much about the chocolate layer.  You just end up with a creamy, fluffy, Hershey chocolate tasting layer, and that's what really matters.
This is one of those recipes that hasn't really been written down.  When I googled "hershey bar pie" it gave me several recipes involving marshmallows.  One looked similar to this one, but it called for sliced almonds on top, not butter-fried coconut.  If you recognize this recipe as belonging to your grandmother or someone you know, drop me a line, and I'll give that person credit.  I don't want to steal from anyone.

Marilyn's Hershey Bar Pie--Bite Size

Ingredients:
  • 24 Oreo Cookies, halved with white filling removed
  • 3 tablespoons butter
  • 2 cups sweetened flaked coconut
  • 1 (8 oz.) container of Cool Whip thawed completely
  • 5 (1.55 oz.) plain milk chocolate Hershey Bars
Instructions:
Set Oreo halves up on a clean cookie sheet.
In a heavy frying pan (I used a large cast iron skillet) over medium heat, melt the butter.  Add flaked coconut and stir constantly for about 5-6 minutes, or until coconut is fragrant and a toasty brown color.  Then move to a paper towel lined plate to cool.
Melt the chocolate in the top of a double boiler--melt until it's about 2/3 melted, and then remove from the bottom part of the double boiler and continue stirring until chocolate is completely melted.  If chocolate feels warm to the touch on the bottom of the bowl, wait for it to cool a bit more.
Stir thawed Cool Whip into melted chocolate.  Don't be afraid to really stir it.  Transfer mixture to a gallon size zip top bag.  Cut 1/2 inch off one of the corners of the bag.  Carefully squeeze about 1 1/2 tablespoons of the chocolate mixture onto each Oreo half.  Top each mini pie with about 1 teaspoon or so of the toasted coconut.
Keep refrigerated until ready to serve.
Makes 48 bite size pies.


Wednesday, May 9, 2012

Almond Flour Chocolate Chip Cookies


Almond Flour Chocolate Chip Cookies


I pinned the picture of this recipe onto my "Beautiful Food" Pinterest board a few days ago because The Wannabe Chef posted such a beautiful picture of them, and I have a few people in my life who have to eat gluten-free.  Then I was instructed by my colleague friend to make some gluten-free yumminess for a gf colleague friend who's going through a rough patch.  Perfect.  I had all the ingredients for these beautiful cookies too.
I've tasted other gf cookies made with almond flour, but they turned out much flatter and gooier than what you see here.  I was impressed with the texture and the flavor of these.  They don't exactly taste like chocolate chip cookies made with all-purpose flour, but they sort of do.  They're soft in the middle and very crisp and dry on the edges. (Update, next day: the cookies are not soft at all in the middle, just a tender kind of crisp.  Still delicious.)  I like them.  Actually, they remind me of the Chinese almond cookies my mom used to buy in a pink box, only with chocolate chips.
A delicious gluten-free chocolate chip cookie, with no weird aftertaste or texture.  I'll be making these again.
Oh, and I should also note that The Wannabe Chef's recipe would have used two eggs, because I doubled what she had, but I think I only put in one egg rather than the two I should have.  Sooo...I like the way they turned out.  If you try it with two eggs, let me know how they turn out.

Almond Flour Chocolate Chip Cookies
   --adapted from The Wannabe Chef who adapted recipe from The Food Lovers' Primal Palate

Ingredients:
  • 1/2 cup butter, room temperature
  • 1/2 cup sugar
  • 1 egg
  • 1 teaspoon vanilla extract
  • 1/2 teaspoon salt
  • 1/2 teaspoon baking soda
  • 3 cups almond flour
  • 2/3 cup chocolate chips
Instructions:
Preheat oven to 375 degrees Fahrenheit.
Cream butter and sugar until very light, about 2-3 minutes.  Add egg and vanilla and beat until incorporated.  Add salt and baking soda and beat until incorporated.  Mix in almond flour.  Fold in chocolate chips.
Scoop about two tablespoon mounds onto a parchment-lined cookie sheet (or use a medium sized cookie scoop), placing about an inch and a half apart.  Gently smoosh dough to make almost 1/2-inch thick disks.  
Bake at 375 degrees for 10-11 minutes, or until the edges are browned.
Allow to cool on cookie sheet for about 5 minutes before moving to a cooling rack to finish cooling.
Makes about 28 cookies.
Dough ball flattened before baking.
Flattened cookies turn out round and pretty.


Saturday, May 5, 2012

Buttermilk Skillet Cake with Streusel Topping

Buttermilk Skillet Cake with Streusel Topping

I pinned this recipe on Pinterest last week, and it has sort of stuck in my head. (Thanks, Charlotte au Chocolat.)  When I decided to bake a coffee cake this morning, I knew I had to do something quick and simple.  Then I remembered this lovely cake.  It was really the walnut praline topping that made the cake so beautiful, but I just couldn't bring myself to serve praline anything for breakfast.  It's psychological.  It WAS okay, though, if I replaced the praline topping with streusel.  Don't ask.  I just did it.  And it is a FABulous cake.  I WILL be making it again, next time with the walnut praline topping, though because that alone makes my mouth water. 
This cake is moist, buttery, tender, and sweet--just what I think a cake should be.  I'm sure it would taste great with just about any topping.  Try this one if you want a sweet and decadent breakfast.

Buttermilk Skillet Cake with Streusel Topping
    -- adapted from Charlotte au Chocolat who got it from Joy the Baker Cookbook
Ingredients for the Cake:
  • 1 1/2 cups all-purpose flour
  • 3/4 teaspoon baking powder
  • 1/4 teaspoon baking soda
  • 3/4 teaspoon salt
  • 6 tablespoons unsalted butter, softened
  • 1 cup granulated sugar
  • 1 large egg
  • 1 large egg yolk
  • 2 teaspoons pure vanilla extract
  • 3/4 cup buttermilk
Ingredients for the Streusel Topping:
  • 1/2 cup flour
  • 1/2 cup white sugar
  • 1/2 teaspoon ground cinnamon
  • 1/4 cup butter, chilled
Instructions:
Preheat your oven to 375 degrees Fahrenheit.
Butter and flour the bottom and sides of an 8 or 9-inch cast-iron skillet (or a 9-inch cake pan).
In a medium bowl, mix the flour, sugar, and cinnamon for the streusel.  Cut the 1/4 cup butter into quarter inch slices, and mash it into the dry mixture with fingers until it is completely incorporated and looks like wet sand.
In a medium bowl, whisk together the flour, baking powder, baking soda, and salt.
In a large bowl or in the bowl of a stand mixer fitted with paddle attachment, beat the butter and sugar until blended and lighter in color, about 3 minutes. Add egg and yolk, beating for a minute between each addition. Beat in the vanilla.Turn the speed to low, and add half of the flour mixture. Next, add the buttermilk, and when the buttermilk is just combined, add the remaining flour and mix until just combined. Remove the bowl from the mixer, and gently finish incorporating the ingredients with a spatula, taking care not to overmix. Pour the batter into prepared skillet or pan, spreading evenly. Sprinkle streusel evenly over the top of the cake batter.  Bake at 375 degrees for about 30 minutes, or until a skewer inserted into the center of the cake comes out clean.
Allow cake to cool about 10 minutes before slicing and serving.
Cake will keep, well wrapped and at room temperature, for up to 4 days.

Macaroni & Cheese ala Panera

Macaroni and Cheese ala Panera

This may come as a shock to many, many people, but after trying a few homemade mac n' cheese recipes, this one being the most recent, I think I've come to the realization that my personal favorite for mac n' cheese comes in a blue box with a picture of Spongebob Squarepants. My 9-year-old son Ezra agrees. I'm fixing some for breakfast for him right now as I type this. (Unfortunately, its ridiculously high sodium content and my high blood pressure prevent me from sharing the box with Ezra. Sigh.)

I made the recipe below at the request of my good friend at work who threw the challenge at me. She said she thought it tasted great. It looks great.  It tasted good.  I just don't like it when mac n' cheese gets really thick and gluey, which is what happened here. I thought about reducing the amount of flour called for, but decided to just go for it. I used two cups 2% milk with 1/2 cup heavy cream.  Everything else I followed. When I looked for "white American cheese" all I found was what was called "Swiss style" processed cheese slices. I know that's not where I went wrong. The flavor of the mac n' cheese was fine. It's the texture I don't enjoy.  
Oh, and my friend told me that Panera's mac n' cheese has little crunchy bread crumbs or something. I think maybe I just need to scoot on over to Panera and try their mac n' cheese.  Yeah. That's what I need to do.
This recipe comes directly from the Panera website, so if you click on the title of the recipe below, you should be taken there to see it for yourself.

Panera Bread’s Signature Macaroni & Cheese 
Adapted by Head Chef Dan Kish

Ingredients
1 (16-ounce) package of rigati pasta (or other small pasta shells)
¼ cup butter
½ cup all-purpose flour
2½ cups 2% reduced fat milk (or cream)
6 slices white American cheese, chopped
1 cup (8 ounces) shredded extra-sharp white Vermont cheddar
1 tablespoon Dijon mustard
1 teaspoon kosher salt
¼ teaspoon hot sauce
Instructions
1. Prepare pasta according to package directions.

2. Melt butter over low heat. Whisk in flour and cook 1 minute, whisking constantly.

3. Gradually whisk in milk (or cream); cook over medium heat, whisking until mixture thickens and bubbles. Remove from heat.

4. Add cheeses, mustard, salt, and hot sauce, stirring until cheese melts and sauce is smooth.

5. Stir in pasta and cook over medium heat for 1 minute (or until thoroughly heated).

Serves 4 to 6

Sorry, Panera.  Kraft mac n' cheese still has my vote.

Friday, May 4, 2012

Ciabatta Crust Pizza


Ciabatta Crust Pizza (small)
Just so you can see how bubbly the crust is.
Interestingly, I'm only posting this recipe separately from my ciabatta bread post because when I was trying to edit the ciabatta bread post, I inadvertently deleted the part about making it into pizza.  So now, ciabatta crust pizza gets its own post.  It's probably better that way.
We have pizza in several forms at our house: ciabatta crust pizza, thin crust pizza, Chicago style pizza, pita bread pizza, Pizza Hut, Northern Lights Pizza (they make the BEST bread sticks), and even Totino's frozen pizza (yes, I LOVE it).  This pizza, though, has my older son's vote as favorite pizza because the crust is also delicious garlic bread.  This crust is light, crisp, and chewy; sturdy enough to hold lots of good toppings, but not heavy at all.  It's also great if you make it ahead and freeze, so you have pizza crusts on hand for a quick meal.  Granted, it's not quick making the crusts--you need to plan at least 24 hours in advance to make it--but if you have time (and a stand mixer and a baking stone), it's well worth the effort.

Ciabatta Crust Pizza

INGREDIENTS

Biga
Dough
Pizza Toppings
  • 2 tablespoons butter, softened
  • 1 cup pizza sauce
  • 8 ounces grated mozzarella cheese
  • 8 ounces grated Italian cheese blend
  • garlic salt to taste
  • your favorite pizza toppings
INSTRUCTIONS
1. FOR THE BIGA: Combine flour, yeast, and water in medium bowl and stir with wooden spoon until uniform mass forms, about 1 minute. Cover bowl tightly with plastic wrap and let stand at room temperature (about 70 degrees) overnight (at least 8 hours and up to 24 hours).
2. FOR THE DOUGH: Place biga and dough ingredients in bowl of stand mixer fitted with paddle attachment. Mix on lowest speed until roughly combined and shaggy dough forms, about 1 minute; scrape down sides of bowl as necessary. Continue mixing on medium-low speed until dough becomes uniform mass that collects on paddle and pulls away from sides of bowl, 4 to 6 minutes. Change to dough hook and knead bread on medium speed until smooth and shiny (dough will be very sticky), about 10 minutes. Transfer dough to large bowl and cover tightly with plastic wrap. Let dough rise at room temperature until doubled in volume, about 1 hour.
Slide parchment with loaves onto inverted, rimmed baking sheet or pizza peel.
3. Spray rubber spatula or bowl scraper with nonstick cooking spray; fold partially risen dough over itself by gently lifting and folding edge of dough toward middle. Turn bowl 90 degrees; fold again. Turn bowl and fold dough six more times (total of eight turns). Cover with plastic wrap and let rise for 30 minutes. Repeat folding, replace plastic wrap, and let rise until doubled in volume, about 30 minutes longer. Meanwhile, adjust oven rack to lower-middle position, place baking stone on rack, and heat oven to 450 degrees Fahrenheit at least 30 minutes before baking.
4. Prepare a pizza peel, inverted cookie sheets, or a rimless baking sheet with parchment paper.  You will need two of these.  Transfer dough to liberally floured counter, being careful not to deflate completely. Liberally flour top of dough and divide in half (or fourths if you want to make small pizzas). Turn 1 piece of dough so cut side is facing up and dust with flour. With well-floured hands, press dough into a rough 12-inch circle (about an 8 inch circle for small pizzas).  Carefully transfer to parchment-lined baking sheet or pizza peel.

5.  Using floured fingertips, evenly poke entire surface of each loaf to make dimples all over the dough (this prevents crust from ballooning into pita bread). Carefully slide parchment with crusts onto baking stone using jerking motion. Bake at 450 degrees for 10-12 minutes, or until bubbles on top and bottom are lightly browned. Transfer to wire rack to cool and wait for pizza making.
Two small crusts.  Not very round, but good.
6.  With a pastry brush, spread some butter around the edge of the crust.  Spread 1/2 cup of sauce onto pizza.  Mix the cheeses in a large bowl and use half (or less) to top the sauce.  Then sprinkle garlic salt all over top of cheese and around the crust edge.  Top with other favorite toppings.  Bake at 450 degrees until cheese is melted and bubbly.  Carefully remove with pan or peel.  Allow to sit for a couple of minutes and then slice with a pizza cutter.  Serve hot, but be careful.

Makes two large, or four small pizzas.


Garlic Cheese Bread

Garlic Cheese Bread ala Marilyn

Here's another favorite fattening food from my mom, Marilyn.  I don't remember her making this much when I was growing up.  I only remember it starting from the time I was in college or so.  I'll have to ask her when and where she got this recipe.  As with many of my (and my mom's) recipes, they've never really had exact measurements, so this is another best guess.  I rarely make an entire loaf of cheese bread either because it's just too good, and nobody needs that many calories in a short period of time.  It is a nice treat once in a while, though.  THAT's for certain.
There are probably plenty of great cheese bread recipes out there.  I just want to keep track of this one since I've never written it down.  The ingredients here are so simple, I don't even think I need to describe the product to you.  It's just yummy bread made yummier with butter, cheese, and garlic salt melted onto it.  For the pics you see here, I used some homemade ciabatta because I had it, and because I actually ruined the loaf by forgetting the salt.  Grrrr.  It needed to be made into something else.  So cheese bread it is!

Garlic Cheese Bread

Ingredients:
  • 1 large French, Italian, or ciabatta loaf
  • 1 1/2 cups shredded cheddar cheese
  • 1 1/2 cups shredded jack cheese
  • 6 tablespoons butter, softened & almost melted
  • 1 1/2 to 2 teaspoons garlic salt
Instructions:
Preheat oven to 400 degrees Fahrenheit.
Slice the loaf of bread lengthwise so you have two large halves that lay down relatively flat, cut side up.
Line a cookie sheet with aluminum foil or parchment paper.
In a large bowl, stir the cheeses, butter, and garlic salt together until thoroughly combined.
Garlic Cheese Ciabatta ready to go into the oven.
Spread enough cheese mix onto each half of the loaf to make about a 1/4 inch thick layer. (Depending on the size of your loaf, you may have leftover cheese spread.  You can refrigerate it and use it later.  Tastes great broiled onto English muffins too.)
Bake at 400 degrees for about 10-15 minutes, or until melted and bubbly.  You can also just turn on the broiler and keep an eye on it, but then the bottom doesn't get crusty at all.  If you like softer cheese bread, then go for the broiler.
Remove bread from oven and cut with a sharp heavy knife using strong downward strokes--don't try to cut it with a serrated knife.

Makes about 10 servings, I think.


01 09